Siovue Video Converter is an all-in-one audio and video tool that integrates video conversion, compression, downloading, and DVD ripping. It supports almost all audio and video formats and uses advanced algorithms to quickly and efficiently process files with superb quality.
Download and Installation
Step 1: Download the Software
Download the latest version from the official Siovue Video Converter website.
System Requirements
- macOS 10.14 or later
- Apple Silicon or Intel processor
- 4GB RAM minimum (8GB recommended)
- 500MB of free disk space
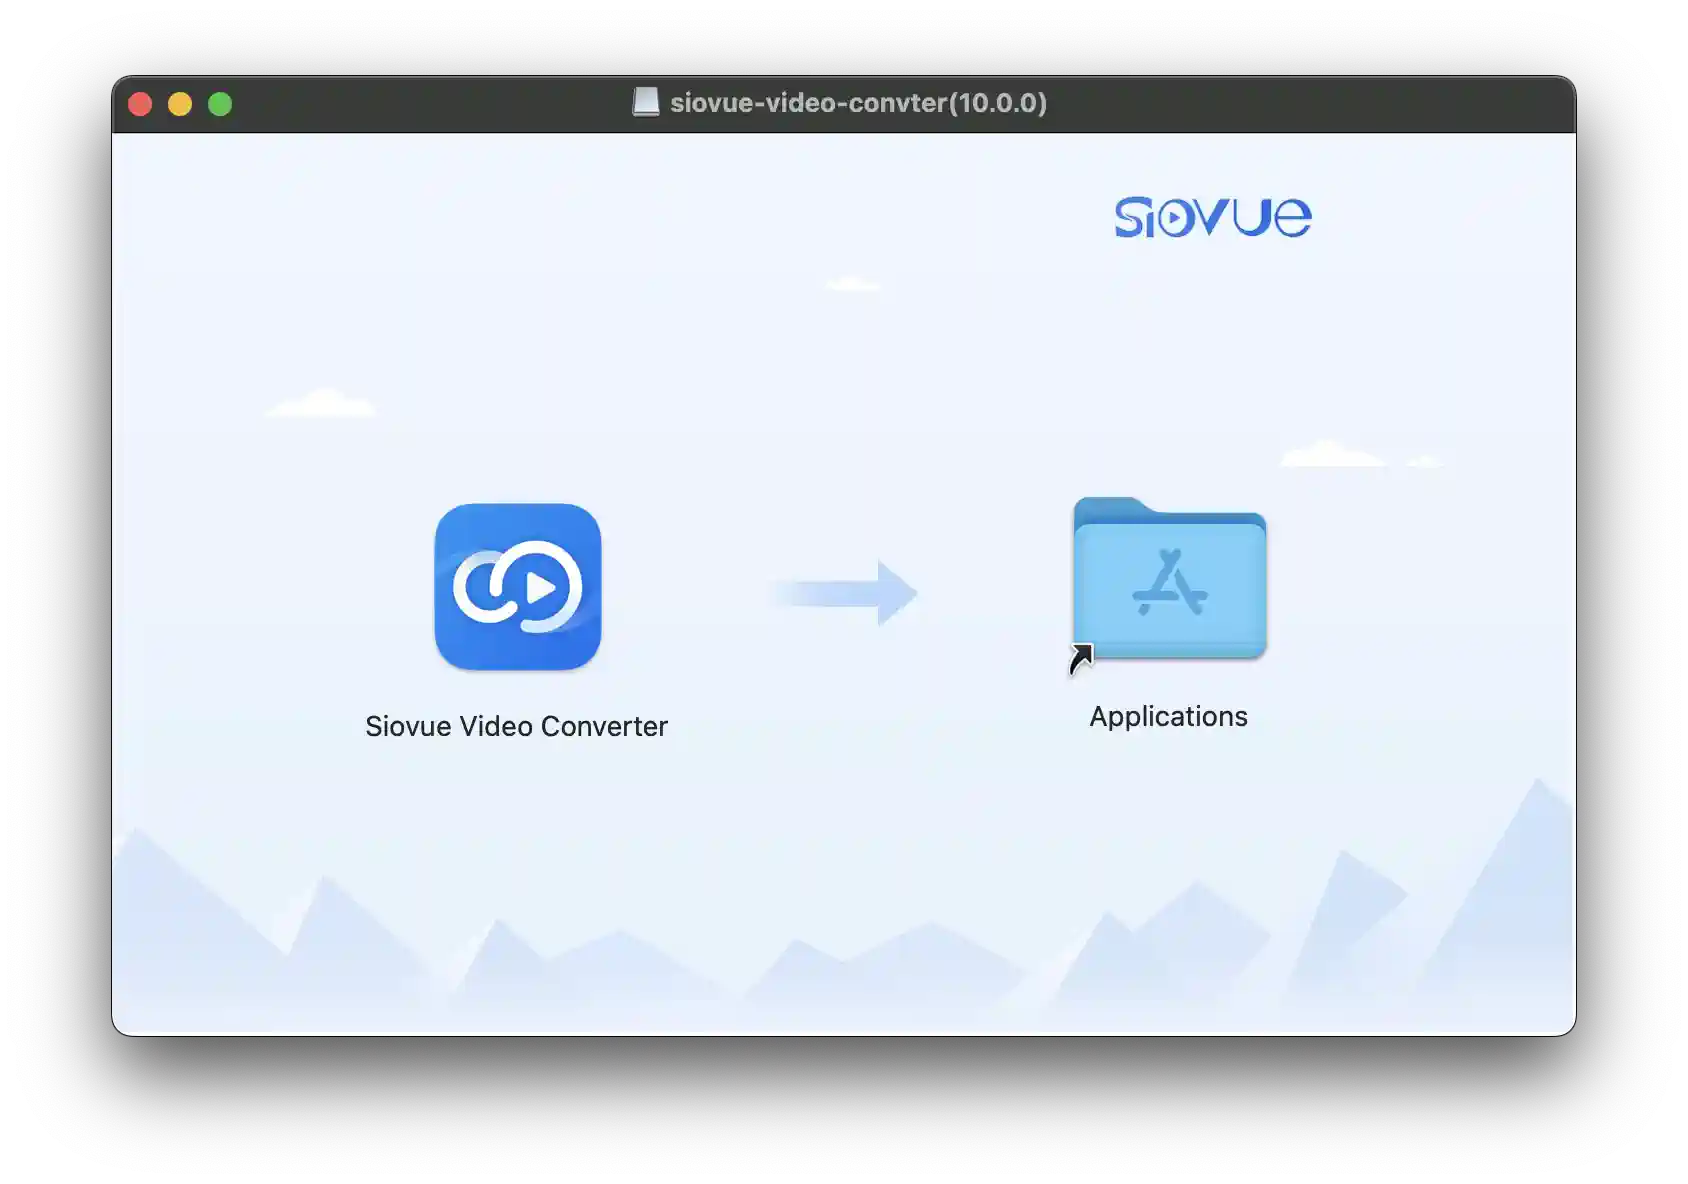
Step 2: Install the Application
Locate and double-click the DMG installer. In the opened package window, drag the Siovue Video Converter icon to the Applications folder. Wait for the copying to complete.
Step 3: Launch the Application
Find Siovue Video Converter in Launchpad and click to open it. You're now ready to start converting videos!
Video Conversion
Video format conversion ensures your videos can be played on different devices and platforms that support various formats, encodings, and resolutions.
Apple-Supported Formats
Audio Formats
- AAC: High-efficiency lossy audio
- ALAC: Apple's lossless audio codec
- MP3: Common lossy audio format
- AIFF: Apple's lossless audio format
Video Formats
- MP4: Container for H.264/H.265
- MOV: Apple's QuickTime format
- M4V: Similar to MP4 with DRM
- H.264/H.265: Video encoding formats
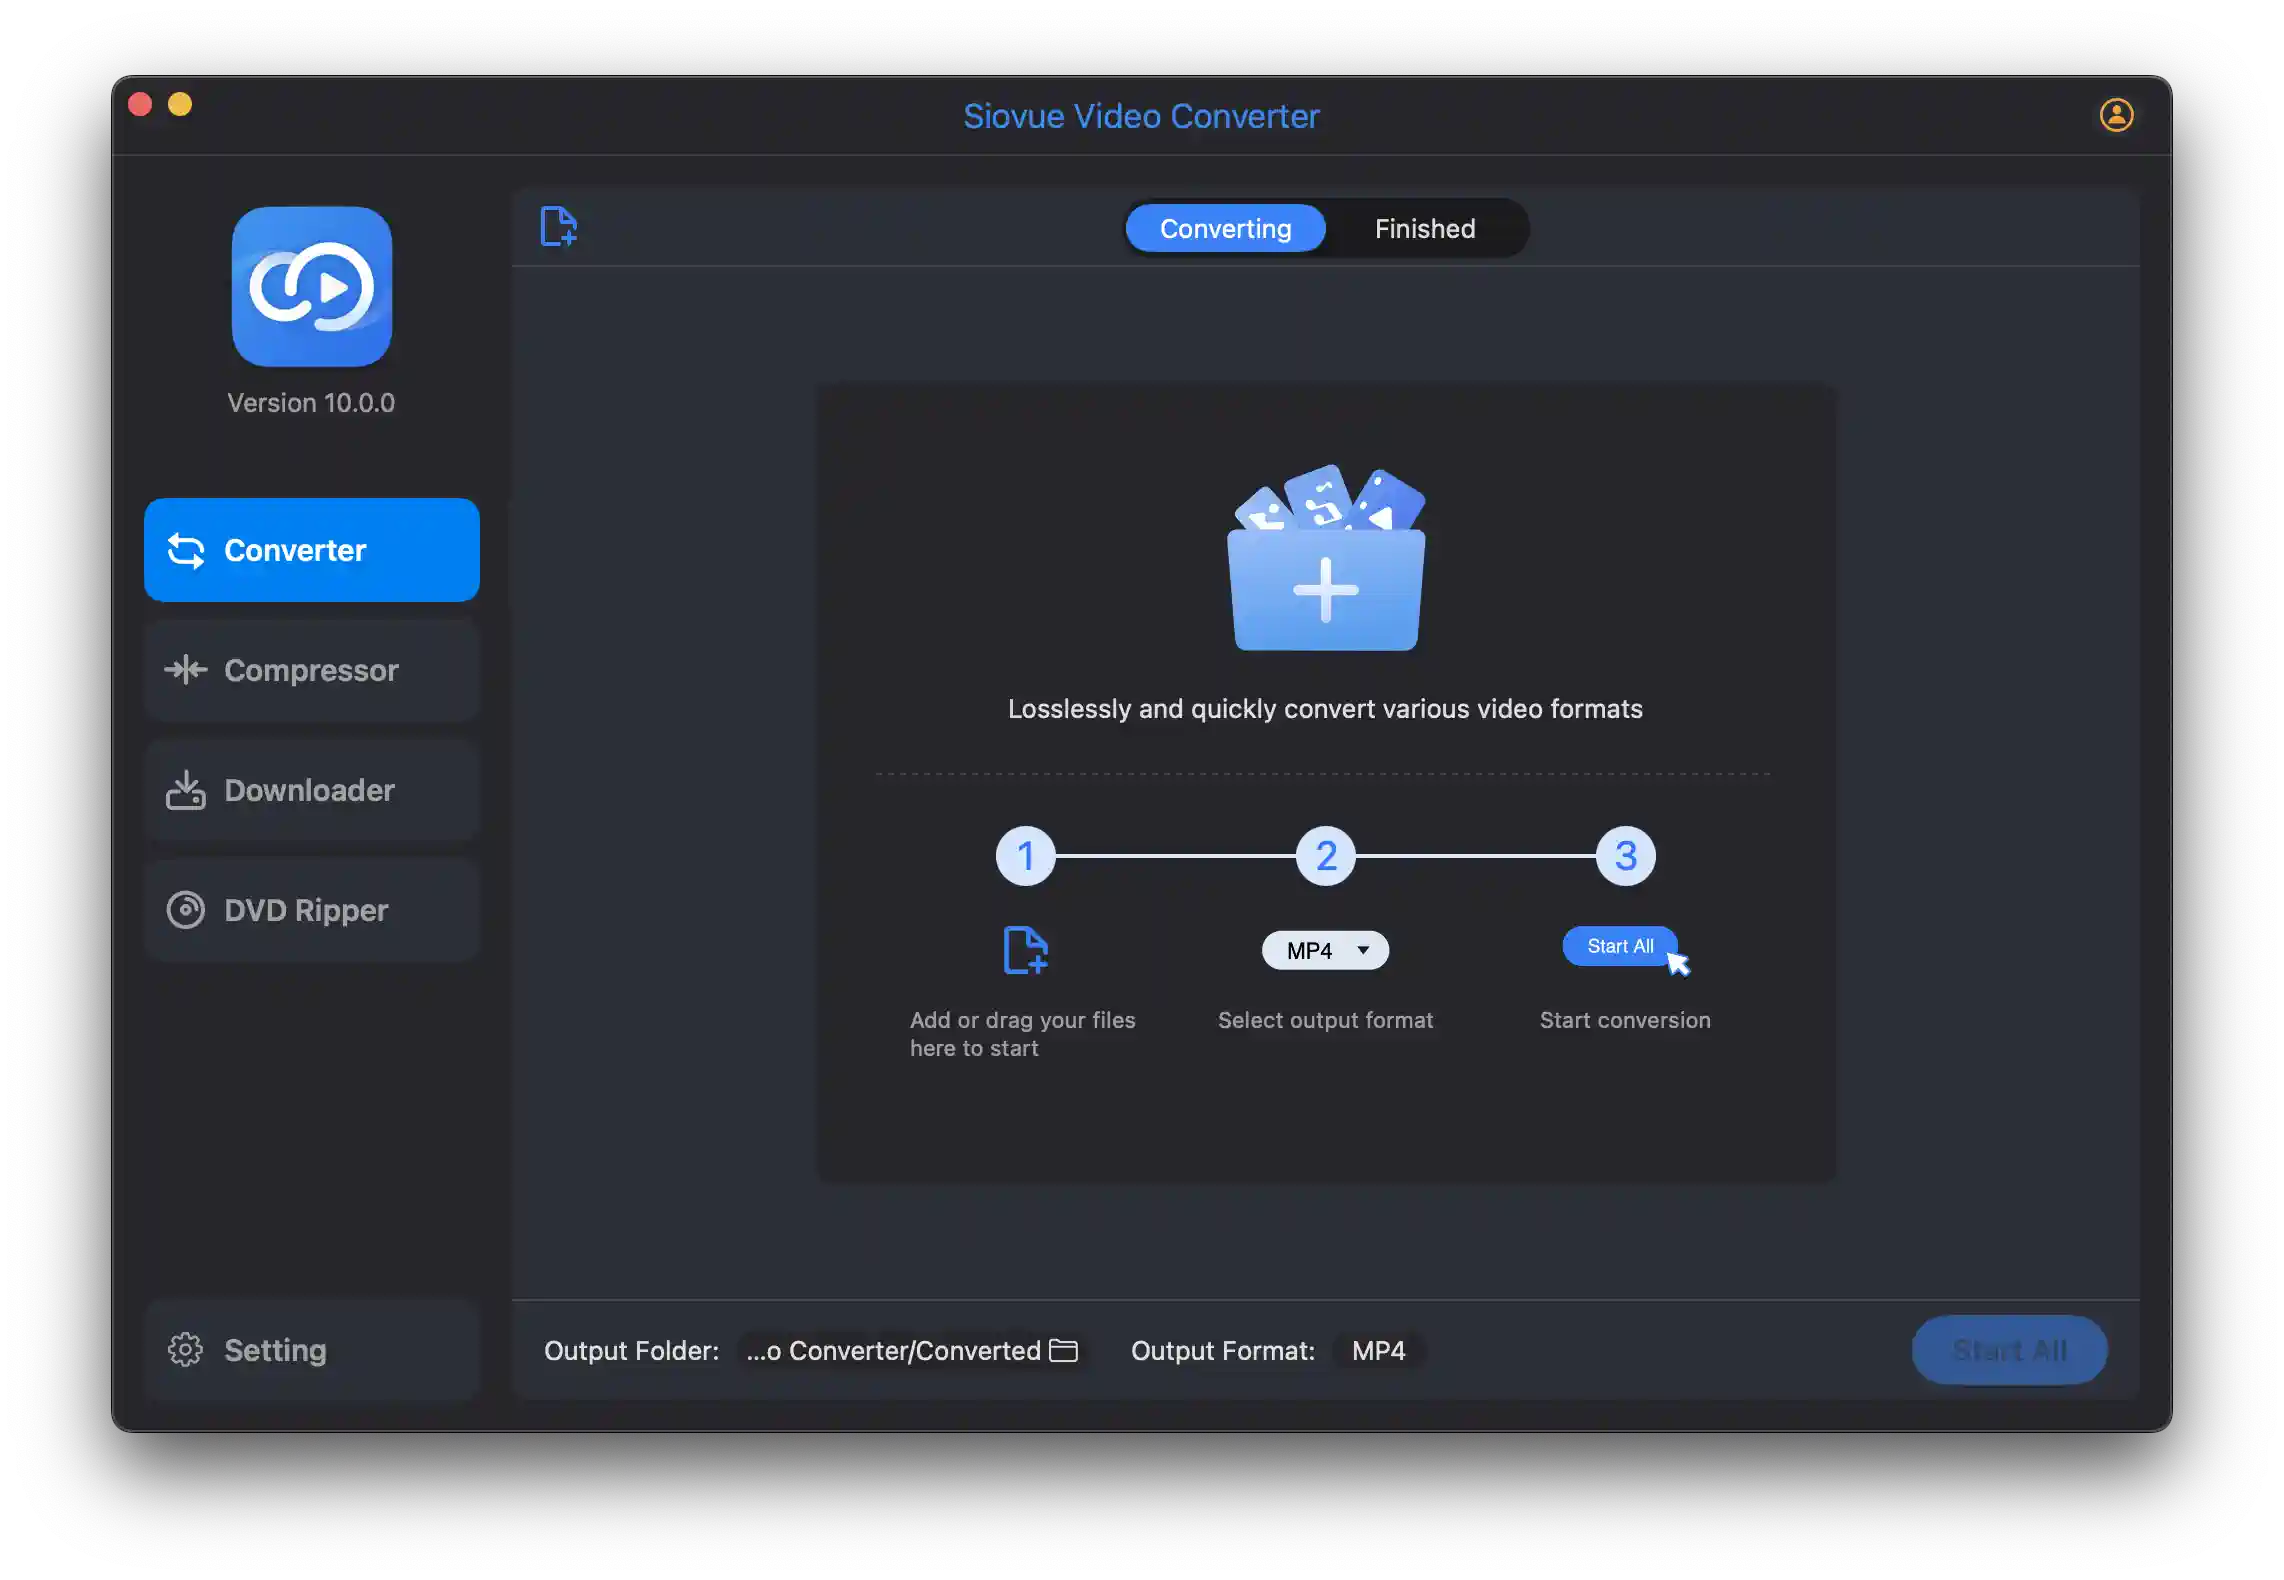
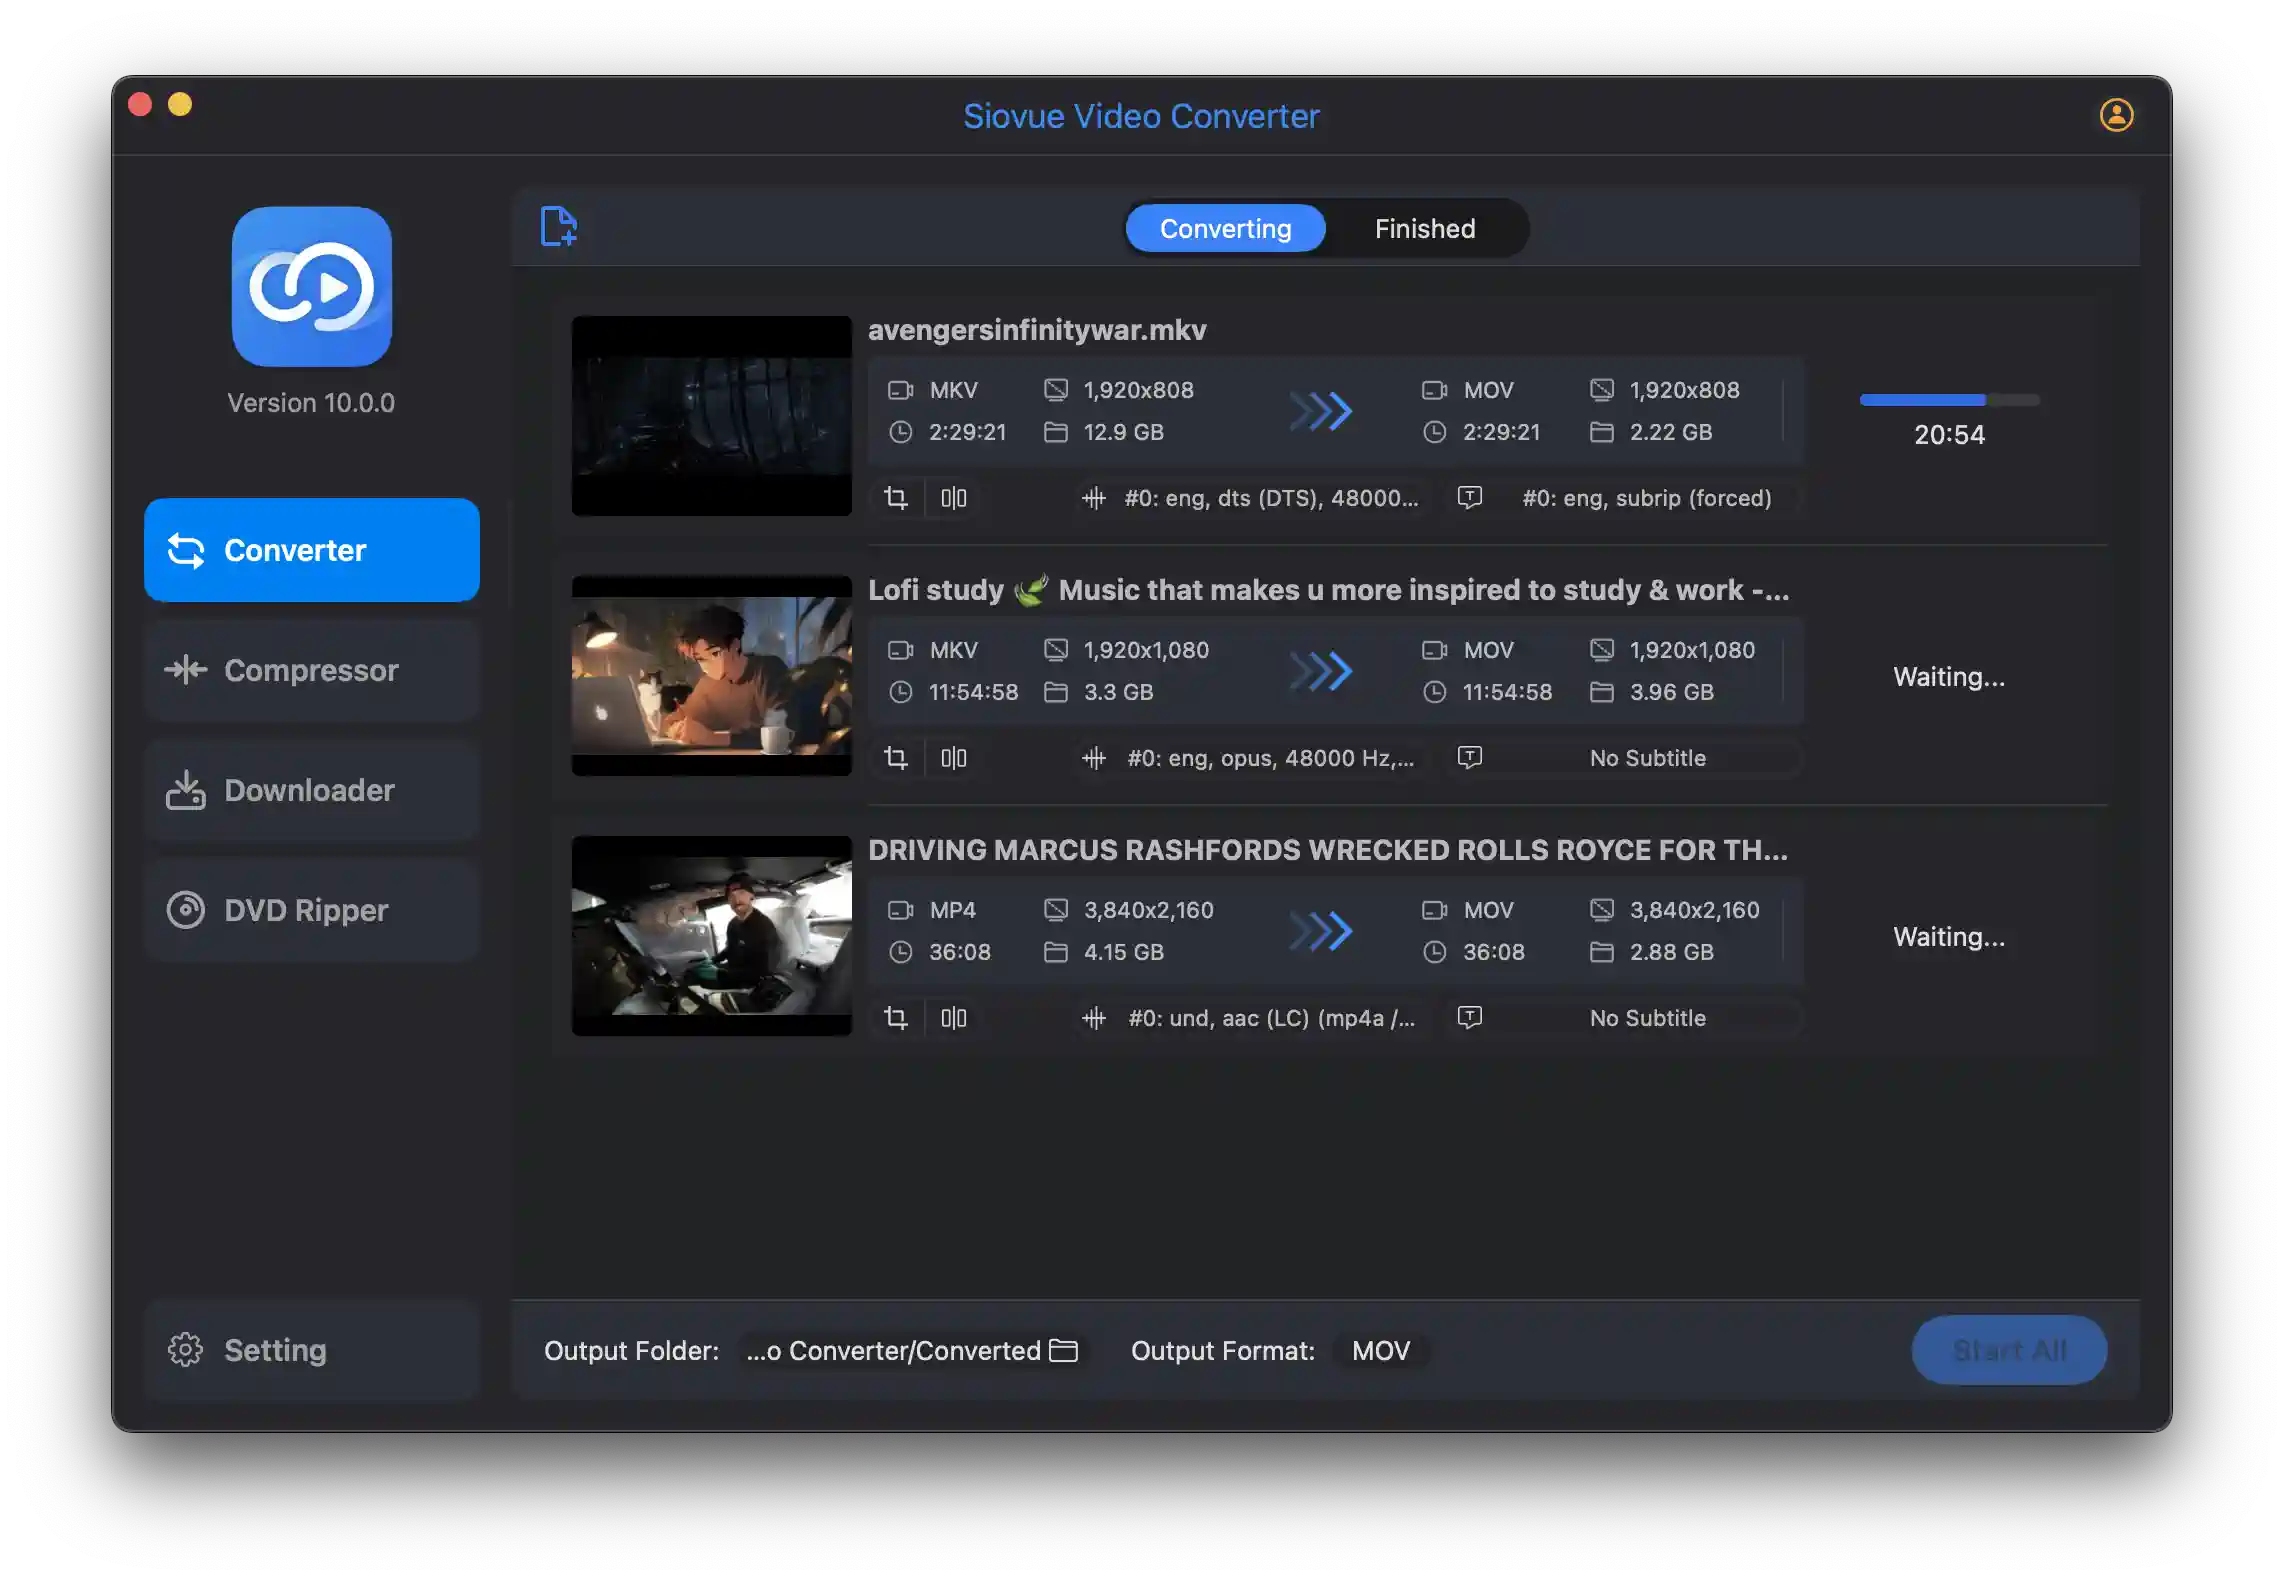
How to Convert Video or Audio
Select Converter in the left column of the main interface.
- Drag and Drop: Simply drag files into the Converter content area.
- Finder Import: Click the
 button or folder icon in the content area to open Finder and select files.
 - Remove Files: Hover over a file and click the
 button that appears in the upper right corner.
Click the  icon at the bottom to open Finder and select a save directory. Alternatively, use the Setting interface to set default directories.
Click the  icon and select your desired output format.
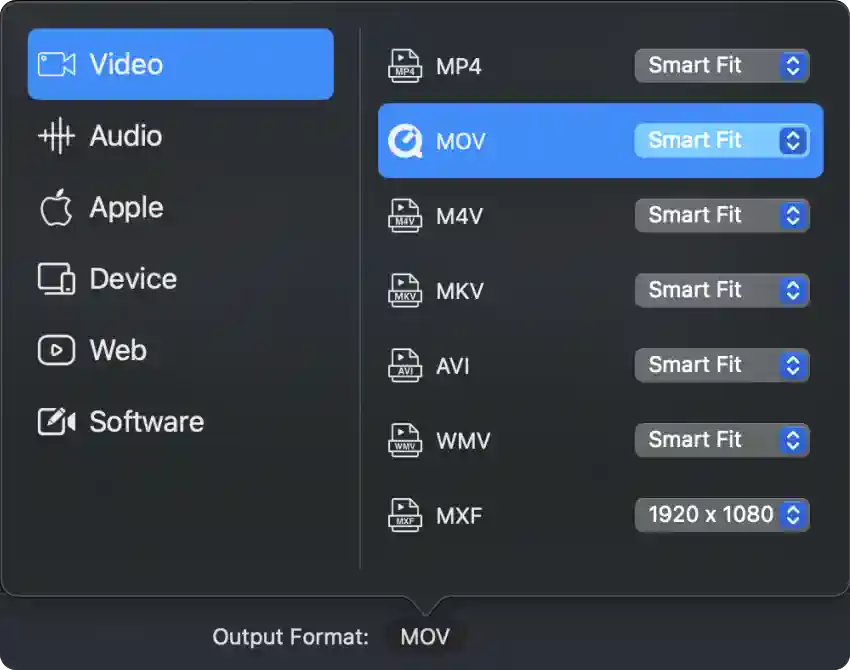
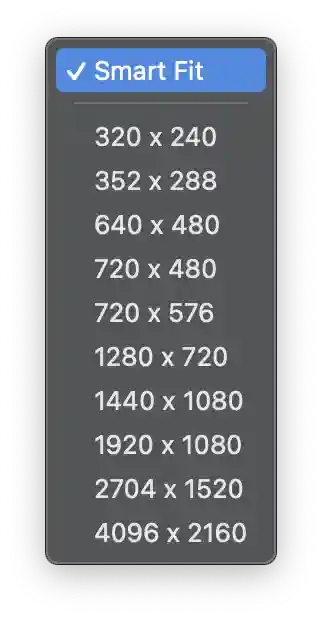
We recommend using Smart Fit resolution, which typically maintains the original resolution but may adjust for optimal playback on specific devices.
How to Trim a Video:
- Using Time Fields: Edit the hours, minutes, and seconds in the start/end time fields. Use the up/down arrows for frame-by-frame accuracy.
- Using Visual Timeline: Drag the start/end capsule icons to set trim points.
- Click OK when finished.
Click the  button to convert all files, or the
  button on individual items to convert only that file.
When conversion completes, the "Finished" tab will show a badge with the number of new files ![]() . Click to view your converted files.
. Click to view your converted files.
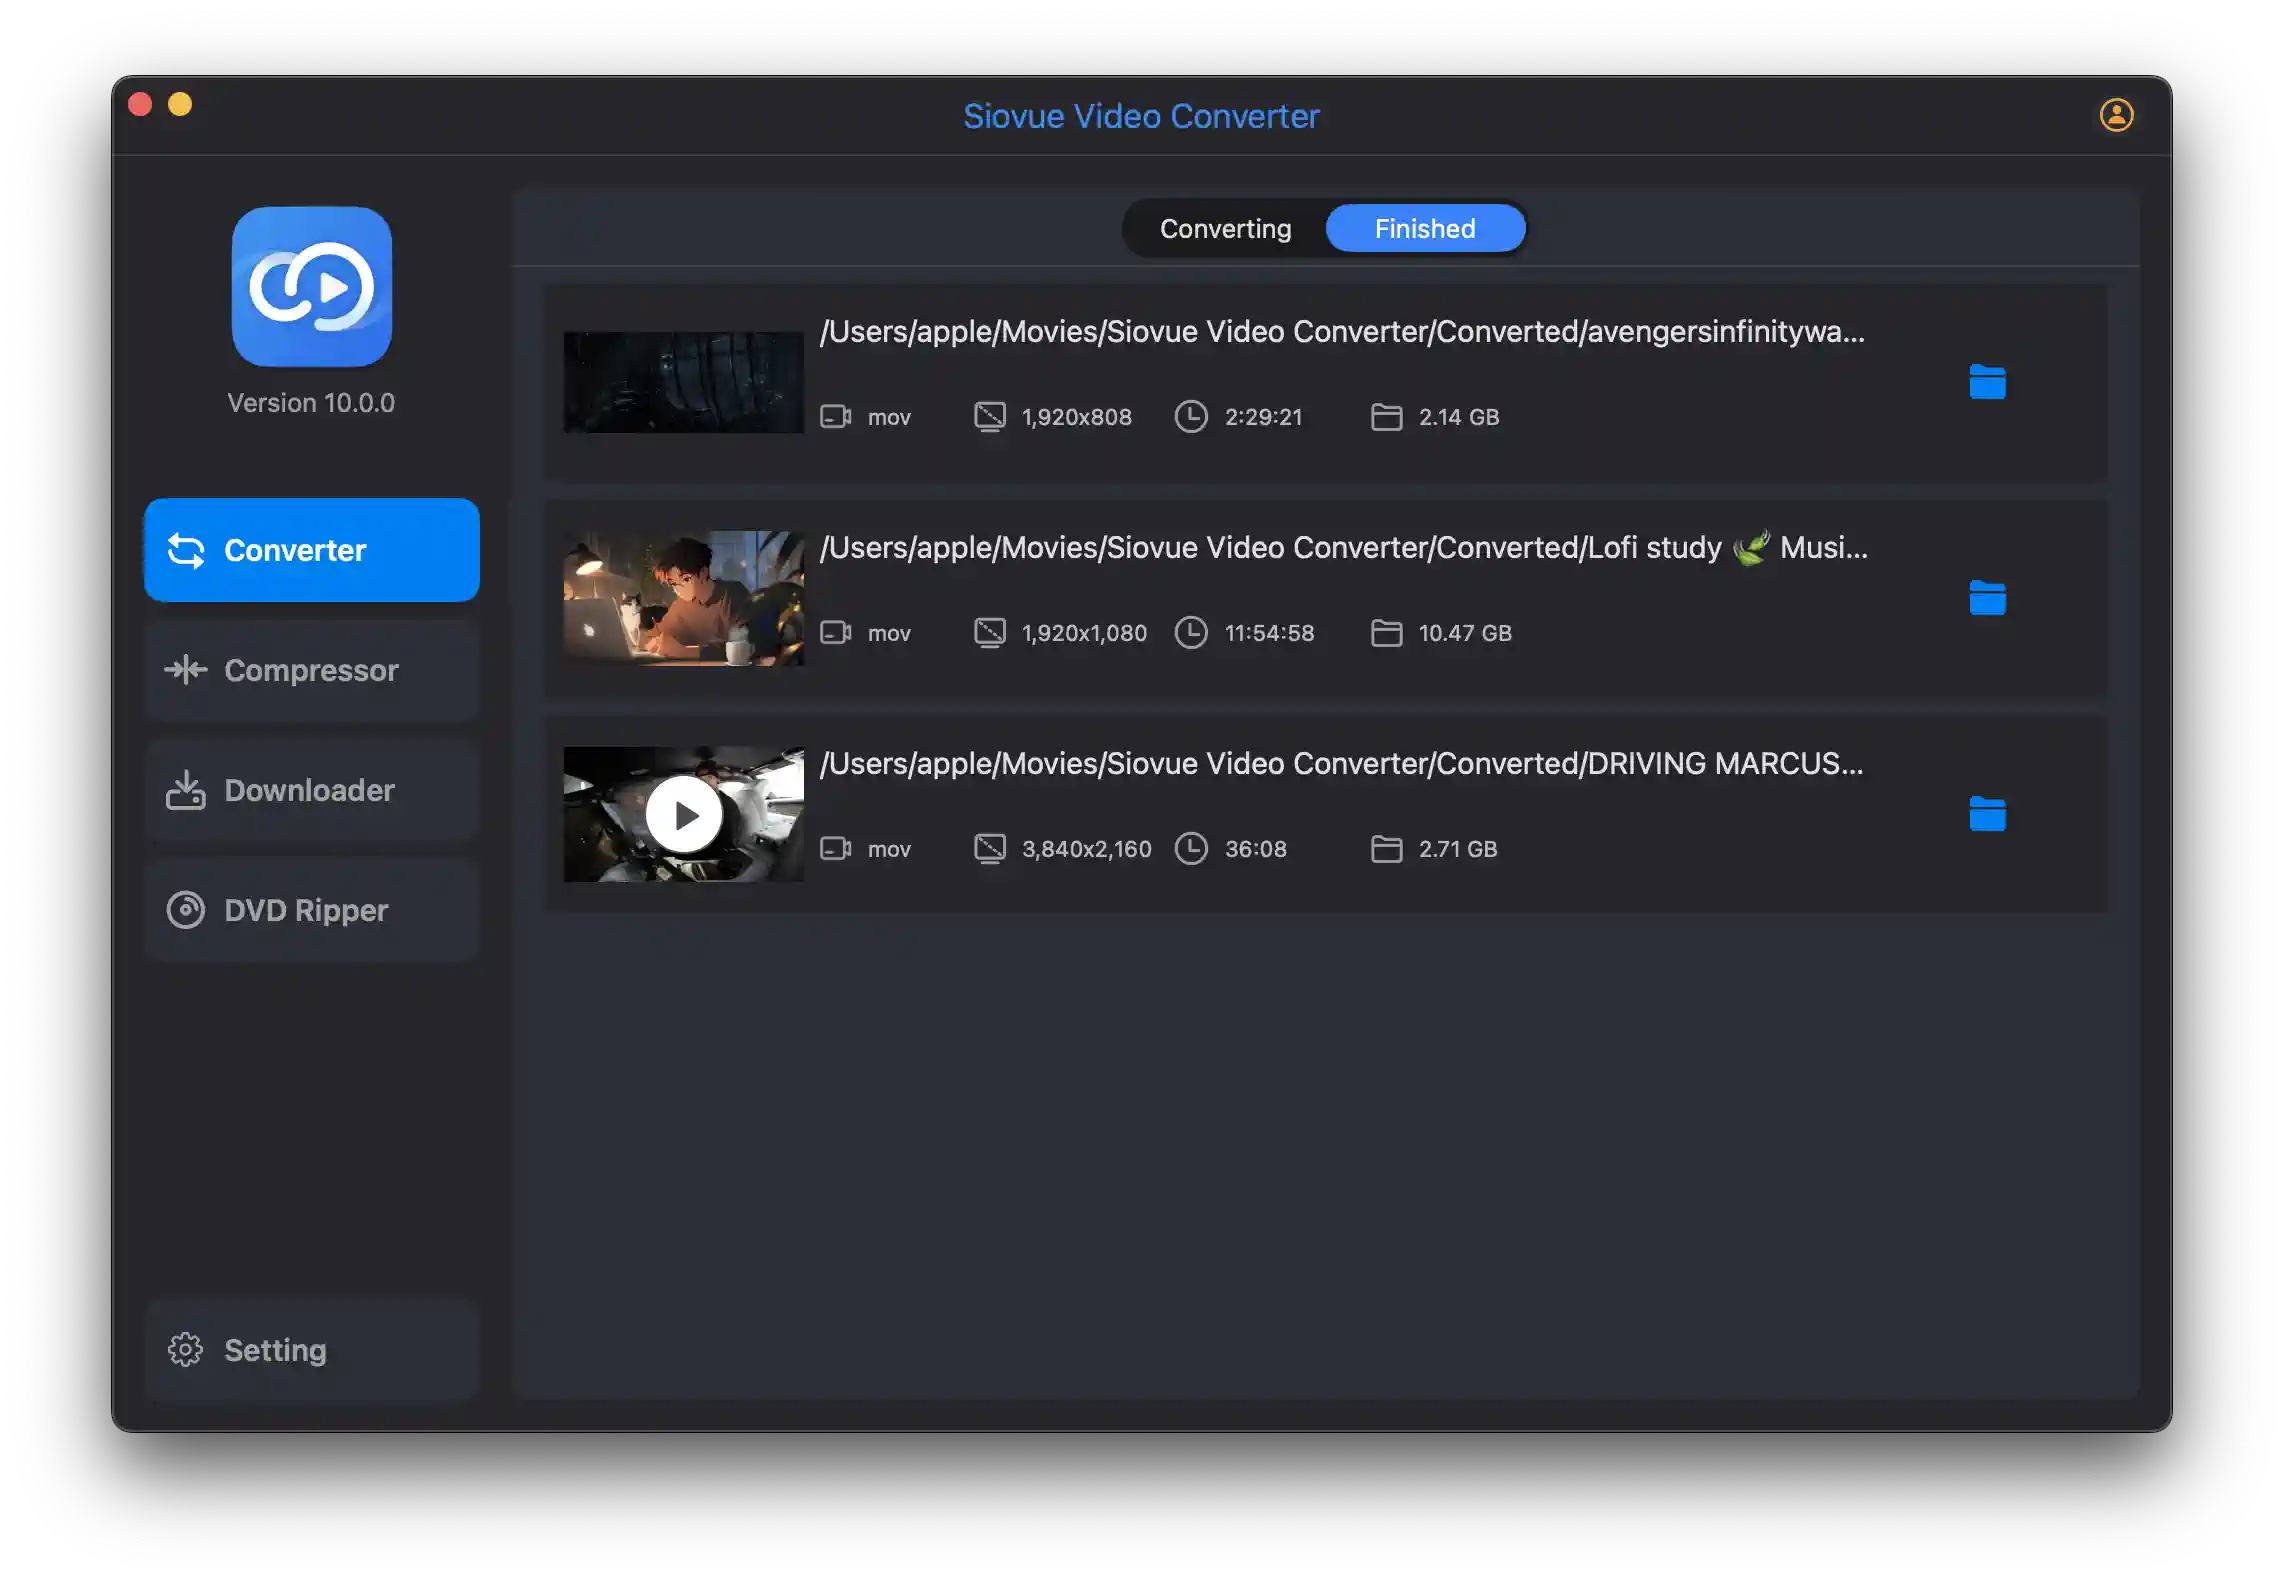
Each file shows format, resolution, duration, and size. Use these actions:
 Opens the file location in Finder
 Plays the file to check quality
Video Compression
Video compression reduces file size while preserving quality, saving storage space and optimizing videos for specific playback scenarios. This is particularly useful for sharing videos online or storing large collections.
Compression Benefits
- Smaller file sizes
- Faster uploads/downloads
- Reduced storage usage
- Optimized streaming
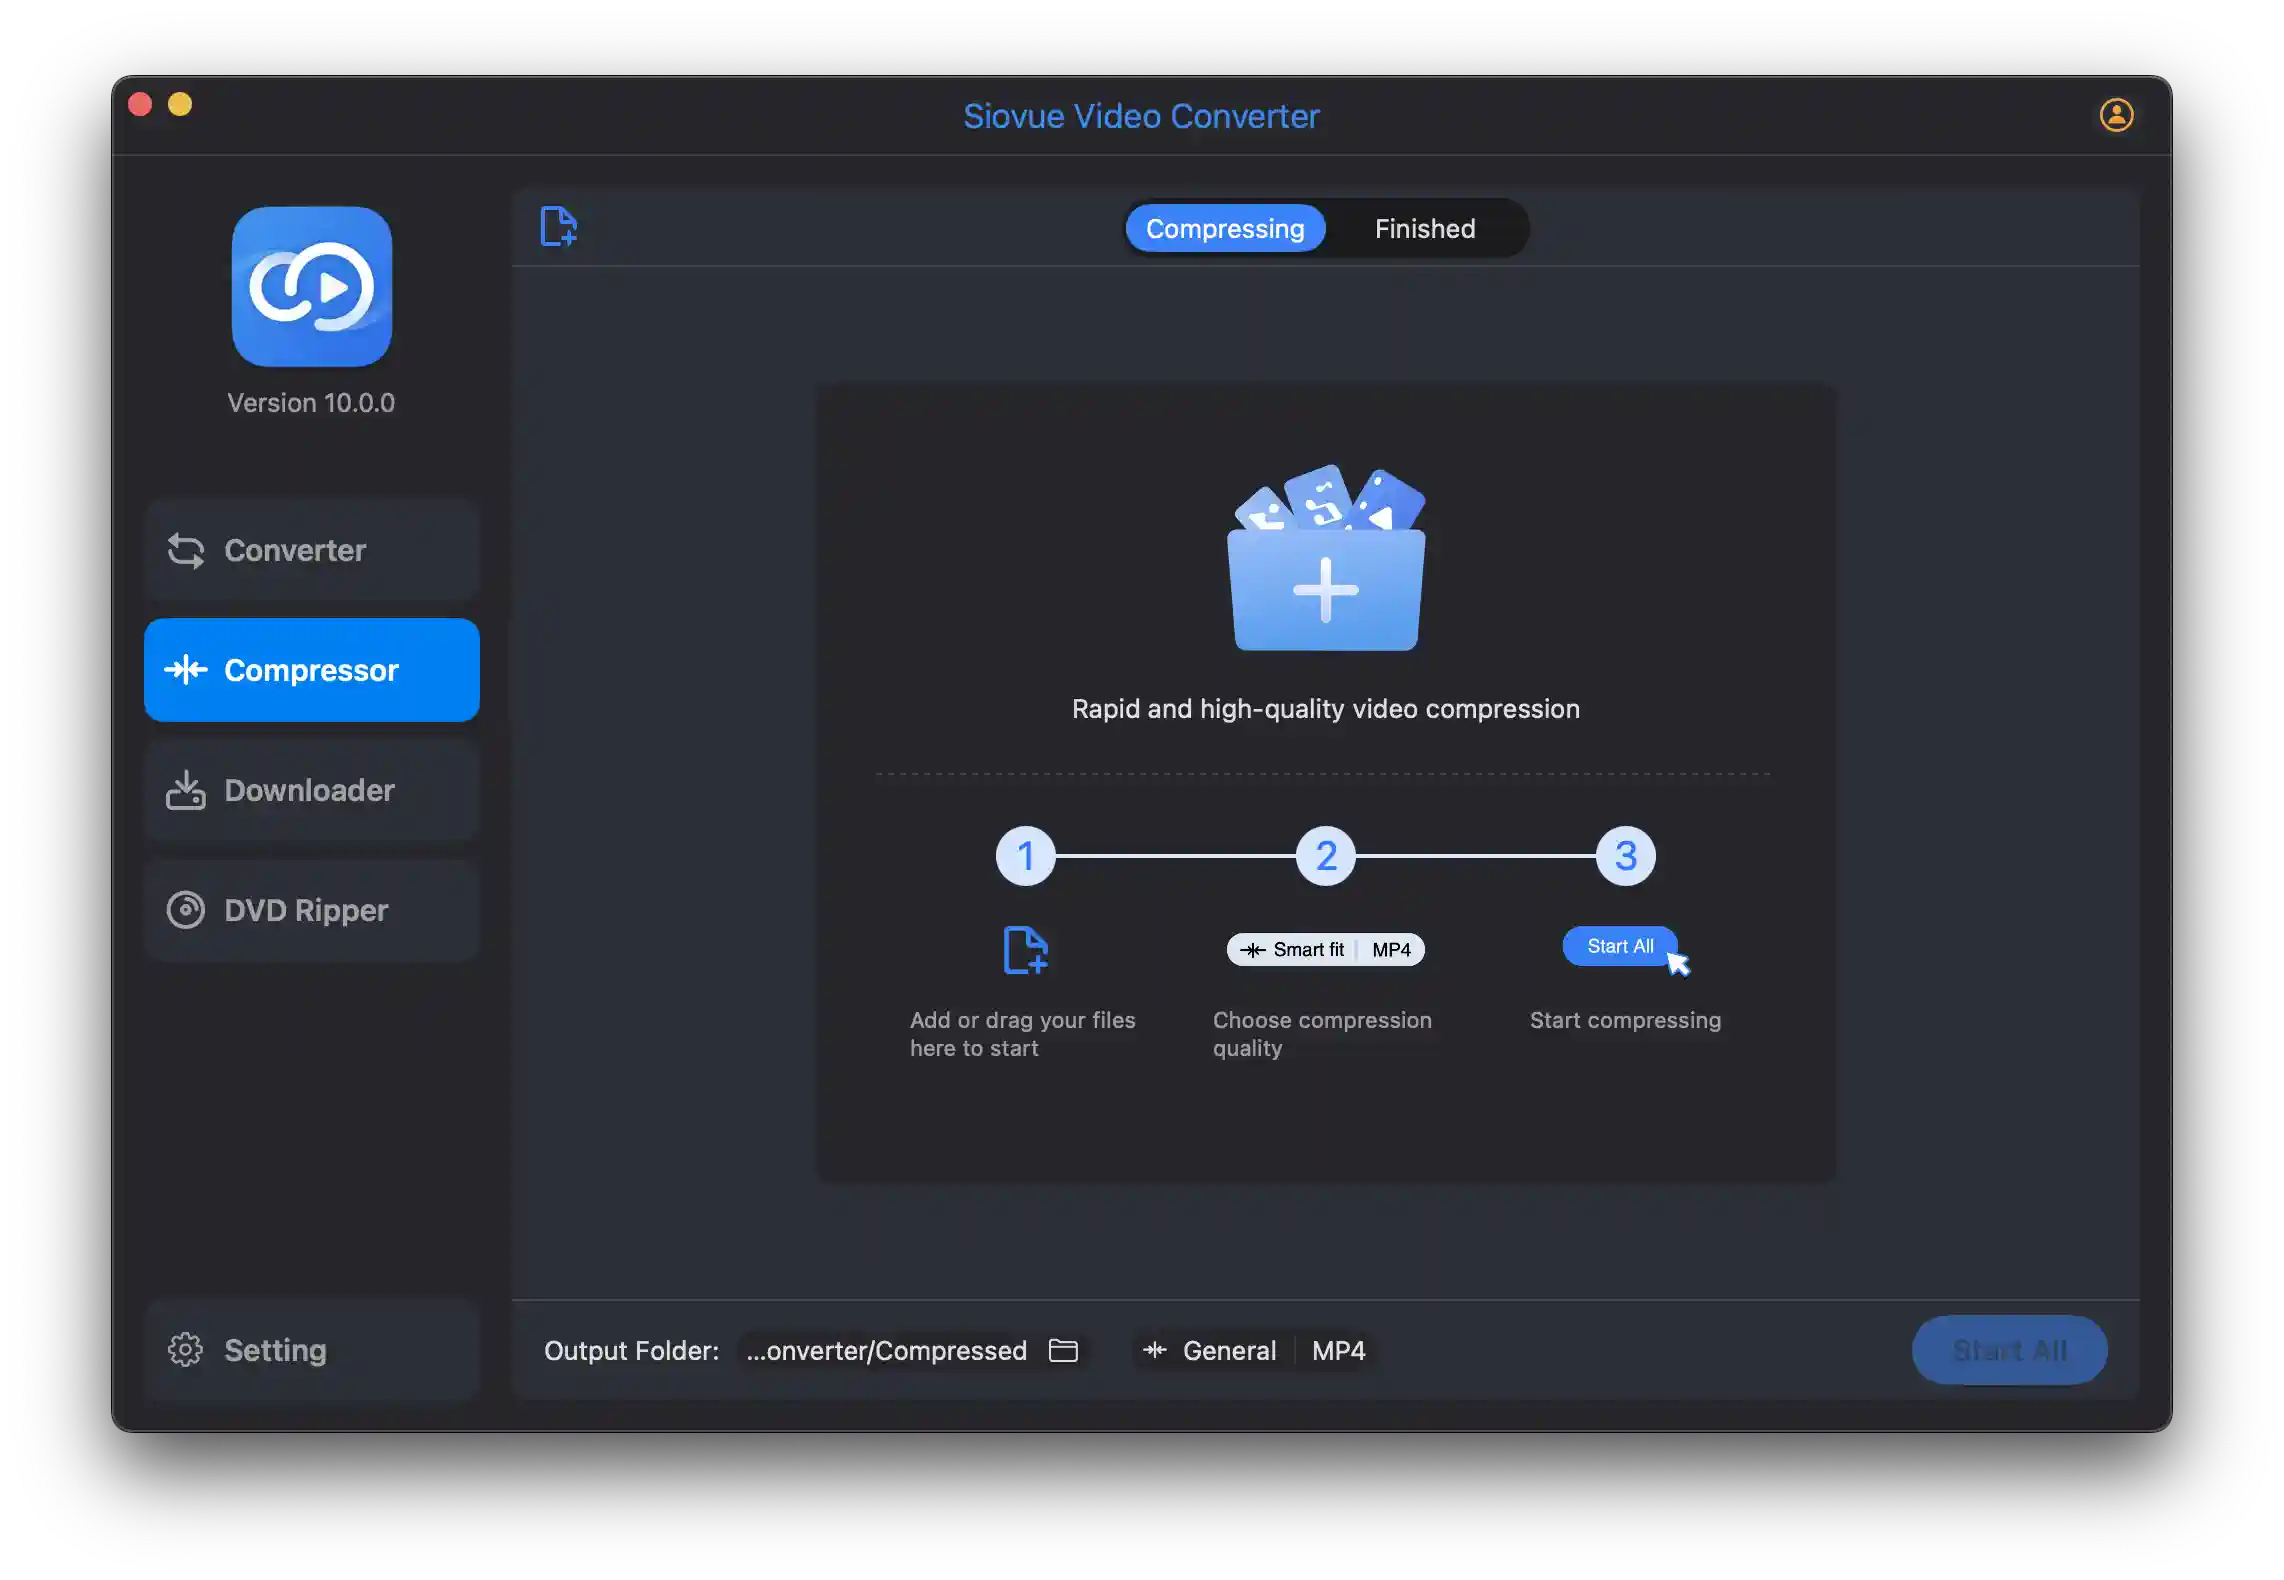
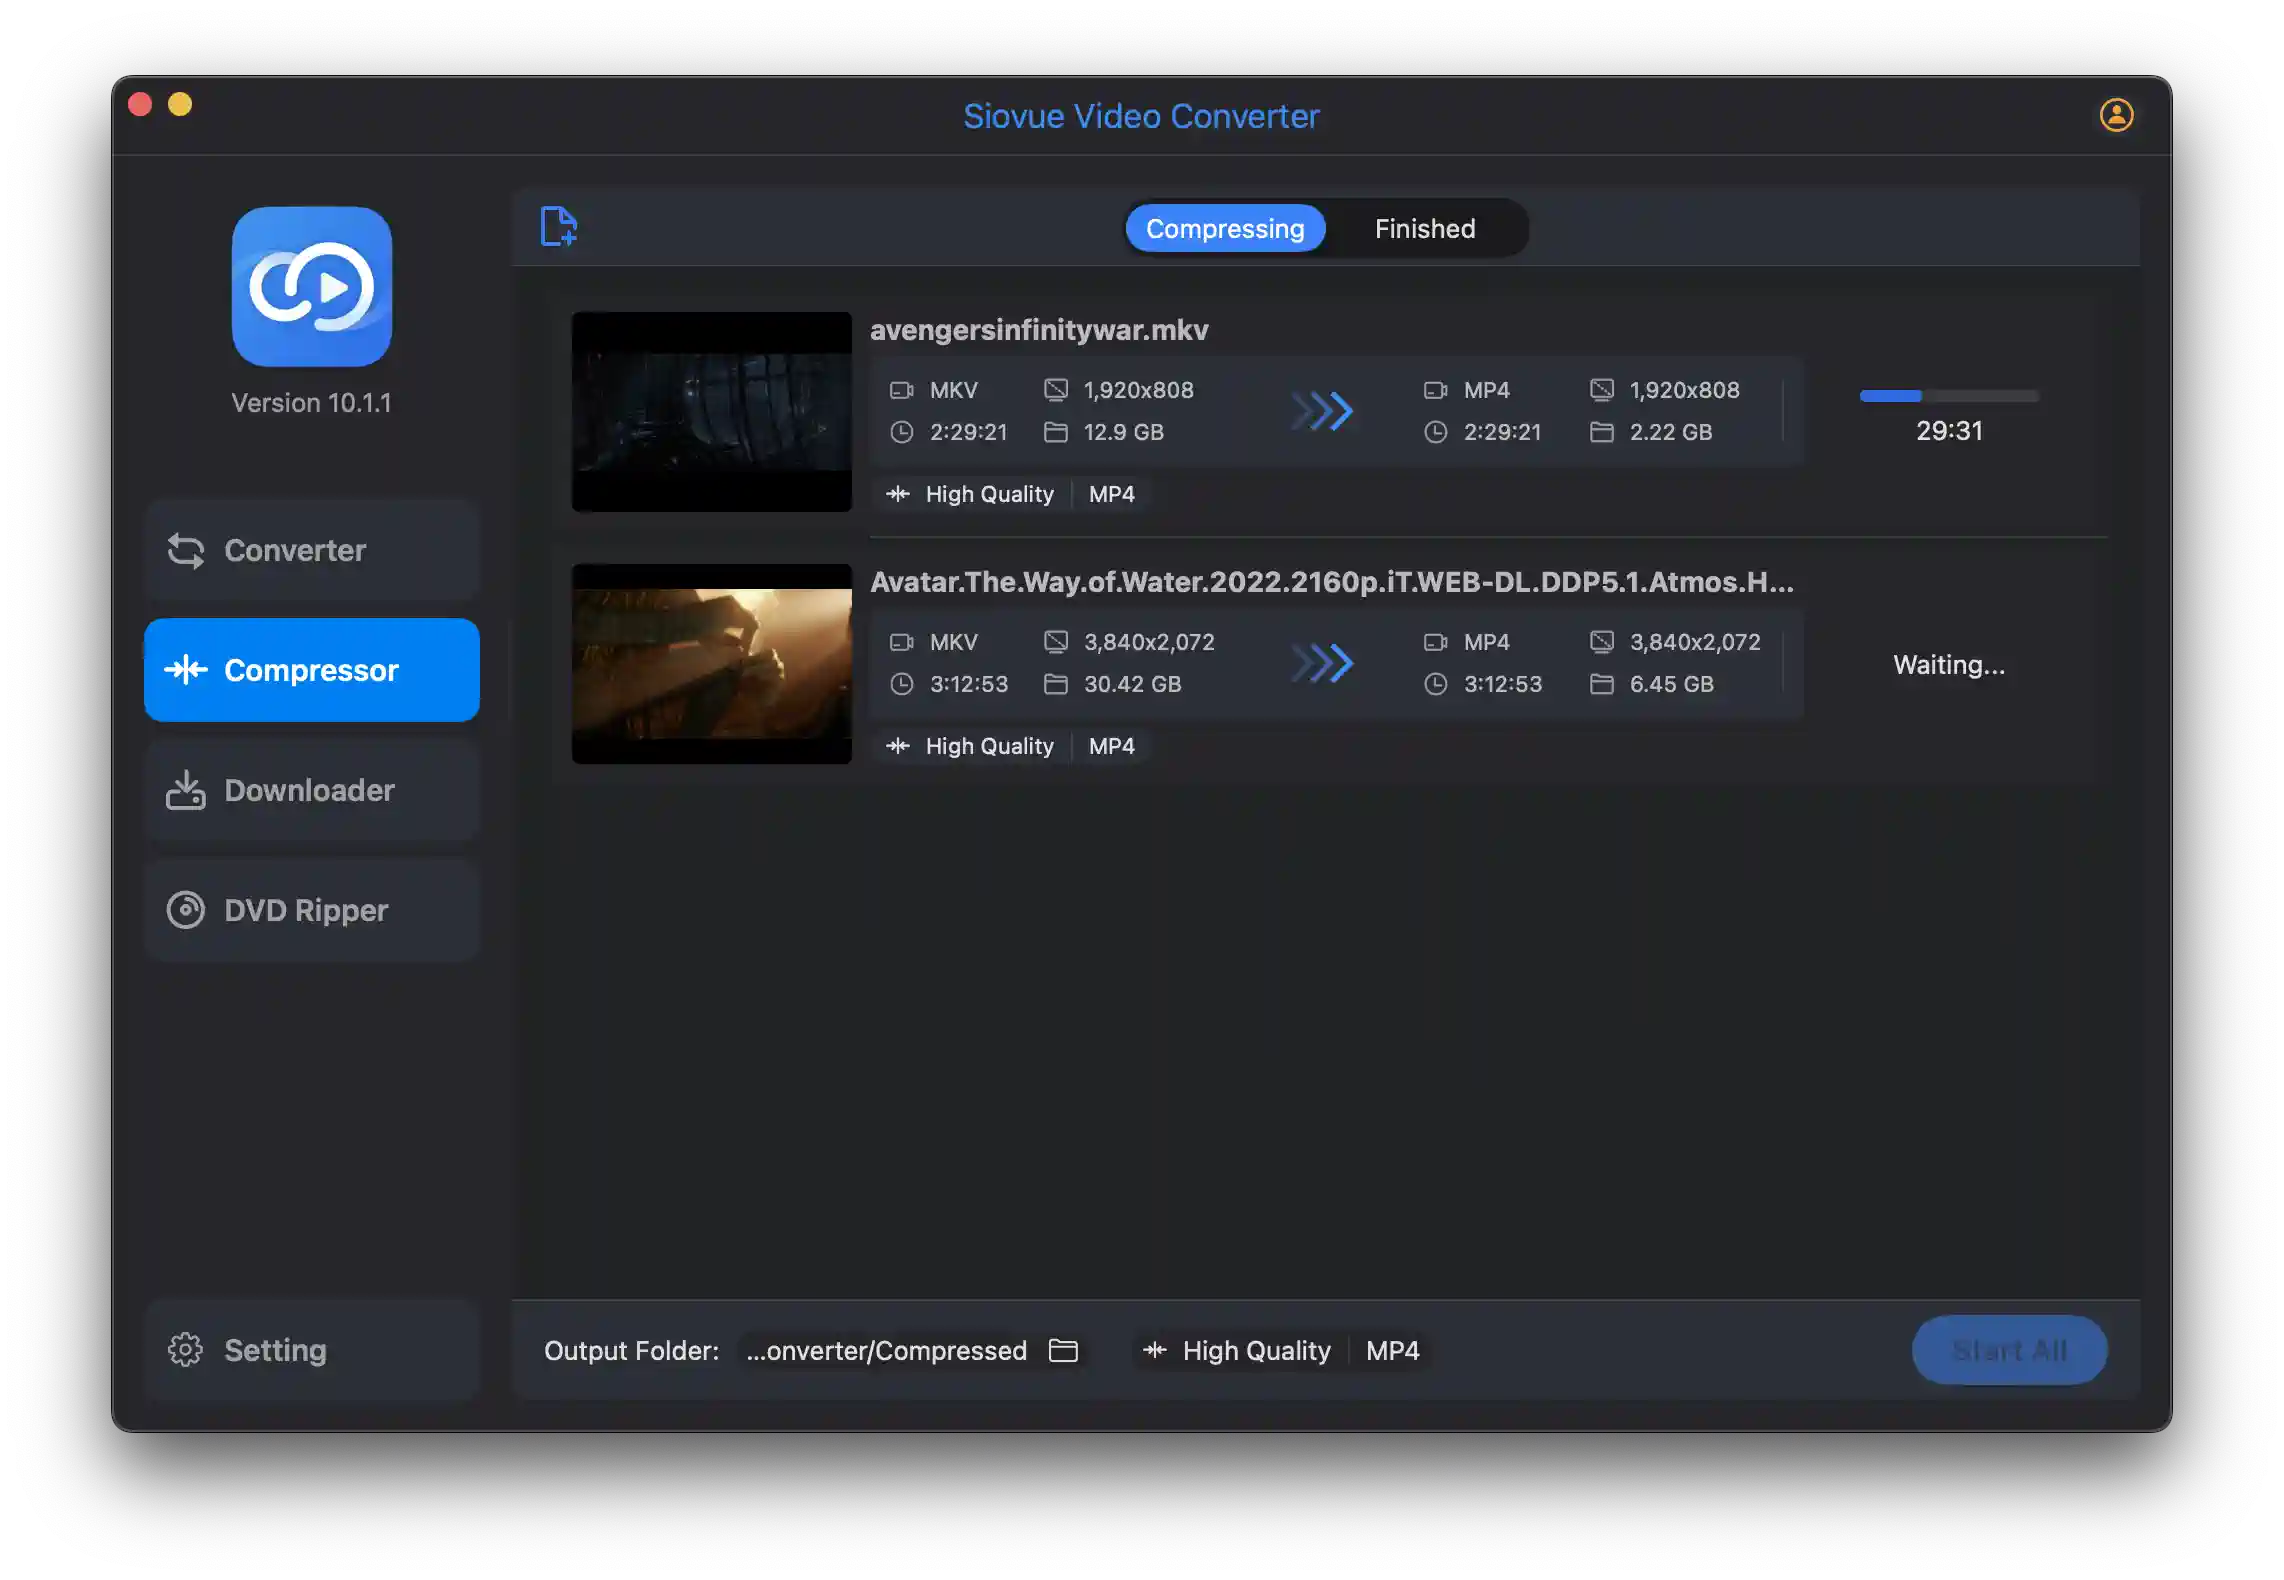
How to Compress Video
Select Compressor in the left column of the main interface.
- Drag and Drop: Drag files into the Compressor content area.
- Finder Import: Click the button to browse and select files.
- Remove Files: Hover over a file and click the button to remove it.
Click the  icon to select where compressed files will be saved. You can also set a default directory in Settings.
- All Videos: Click the
 icon at the bottom of the Compressor area.
 - Single Video: Click the same icon in the individual video view.
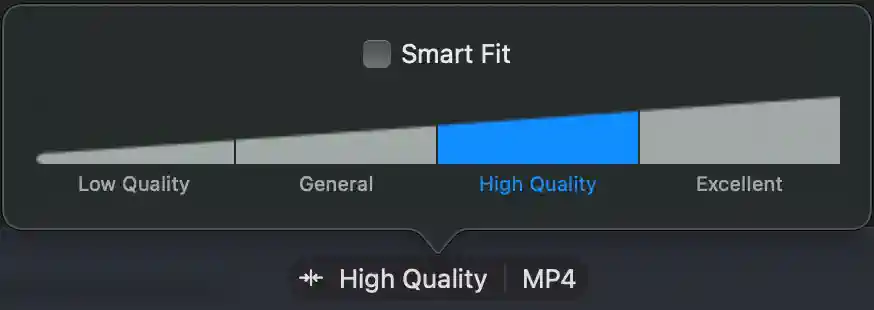
Quality Guide: Higher quality retains more detail but results in larger file sizes. Lower quality gives smaller files but may reduce visual clarity.
Click the button to compress all files, or the  button on individual items.
When compression completes, check the "Finished" tab ![]() to view your compressed videos.
to view your compressed videos.
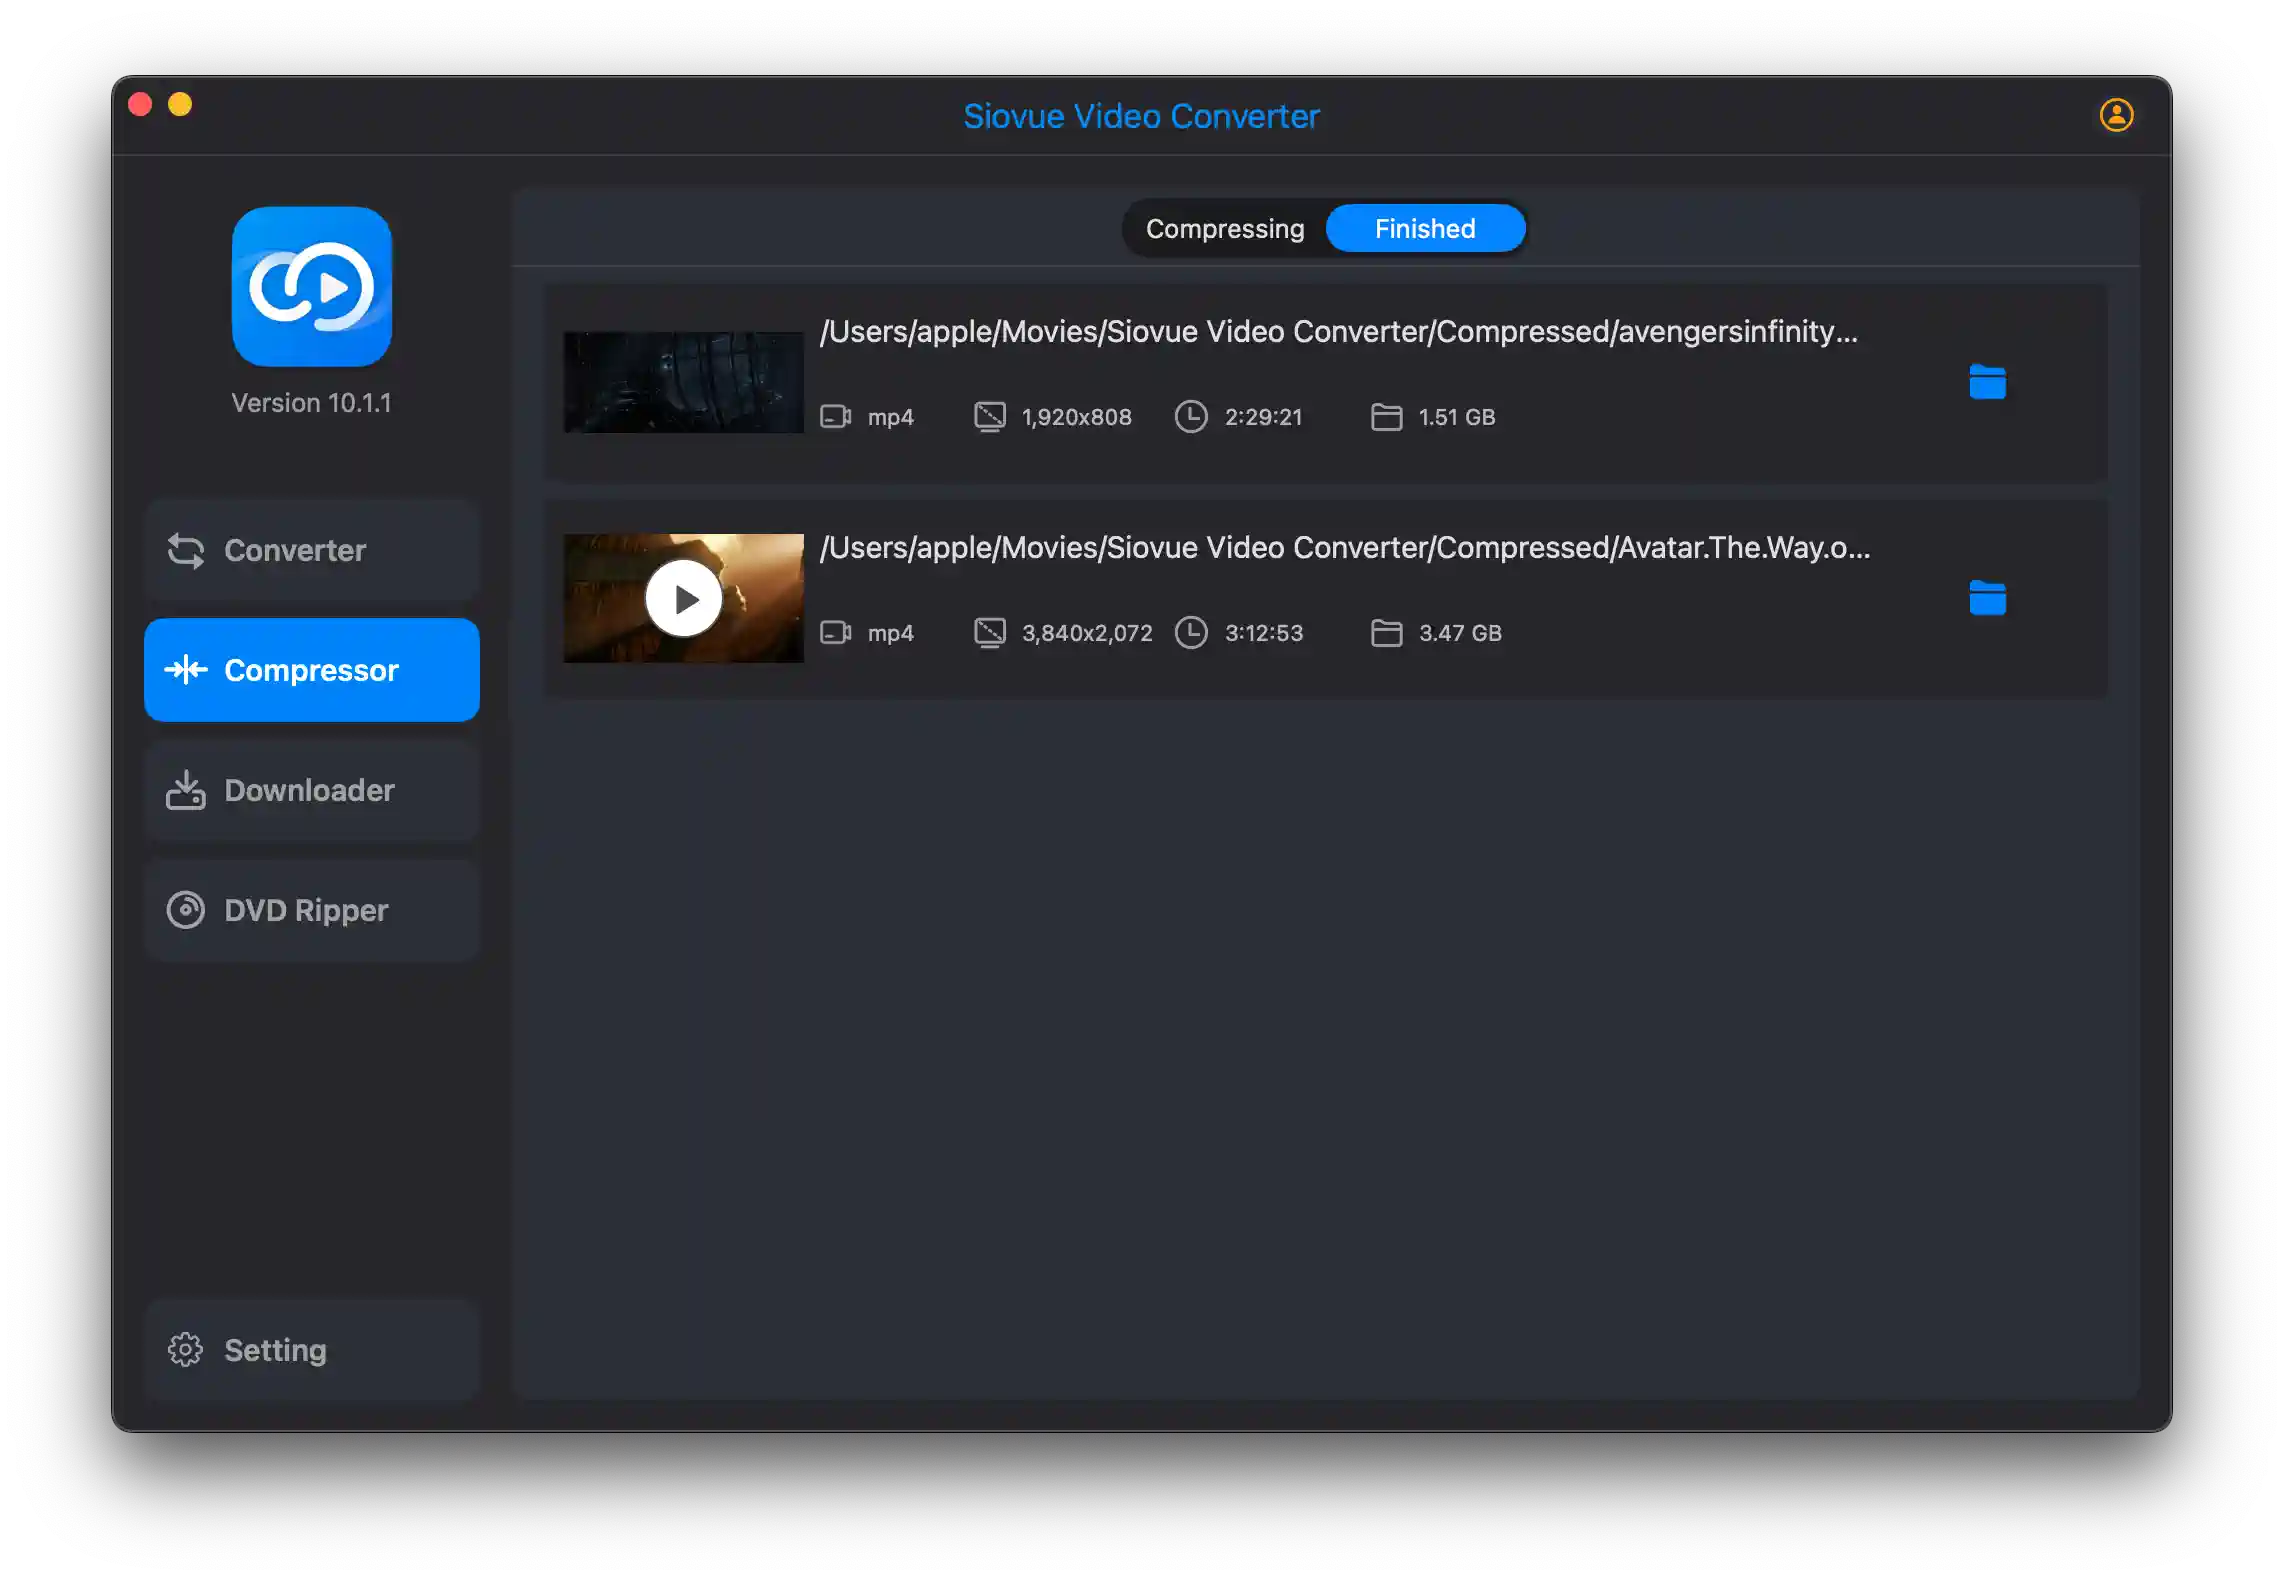
For each file, you can:
- Open file location in Finder
- Play the file to verify quality
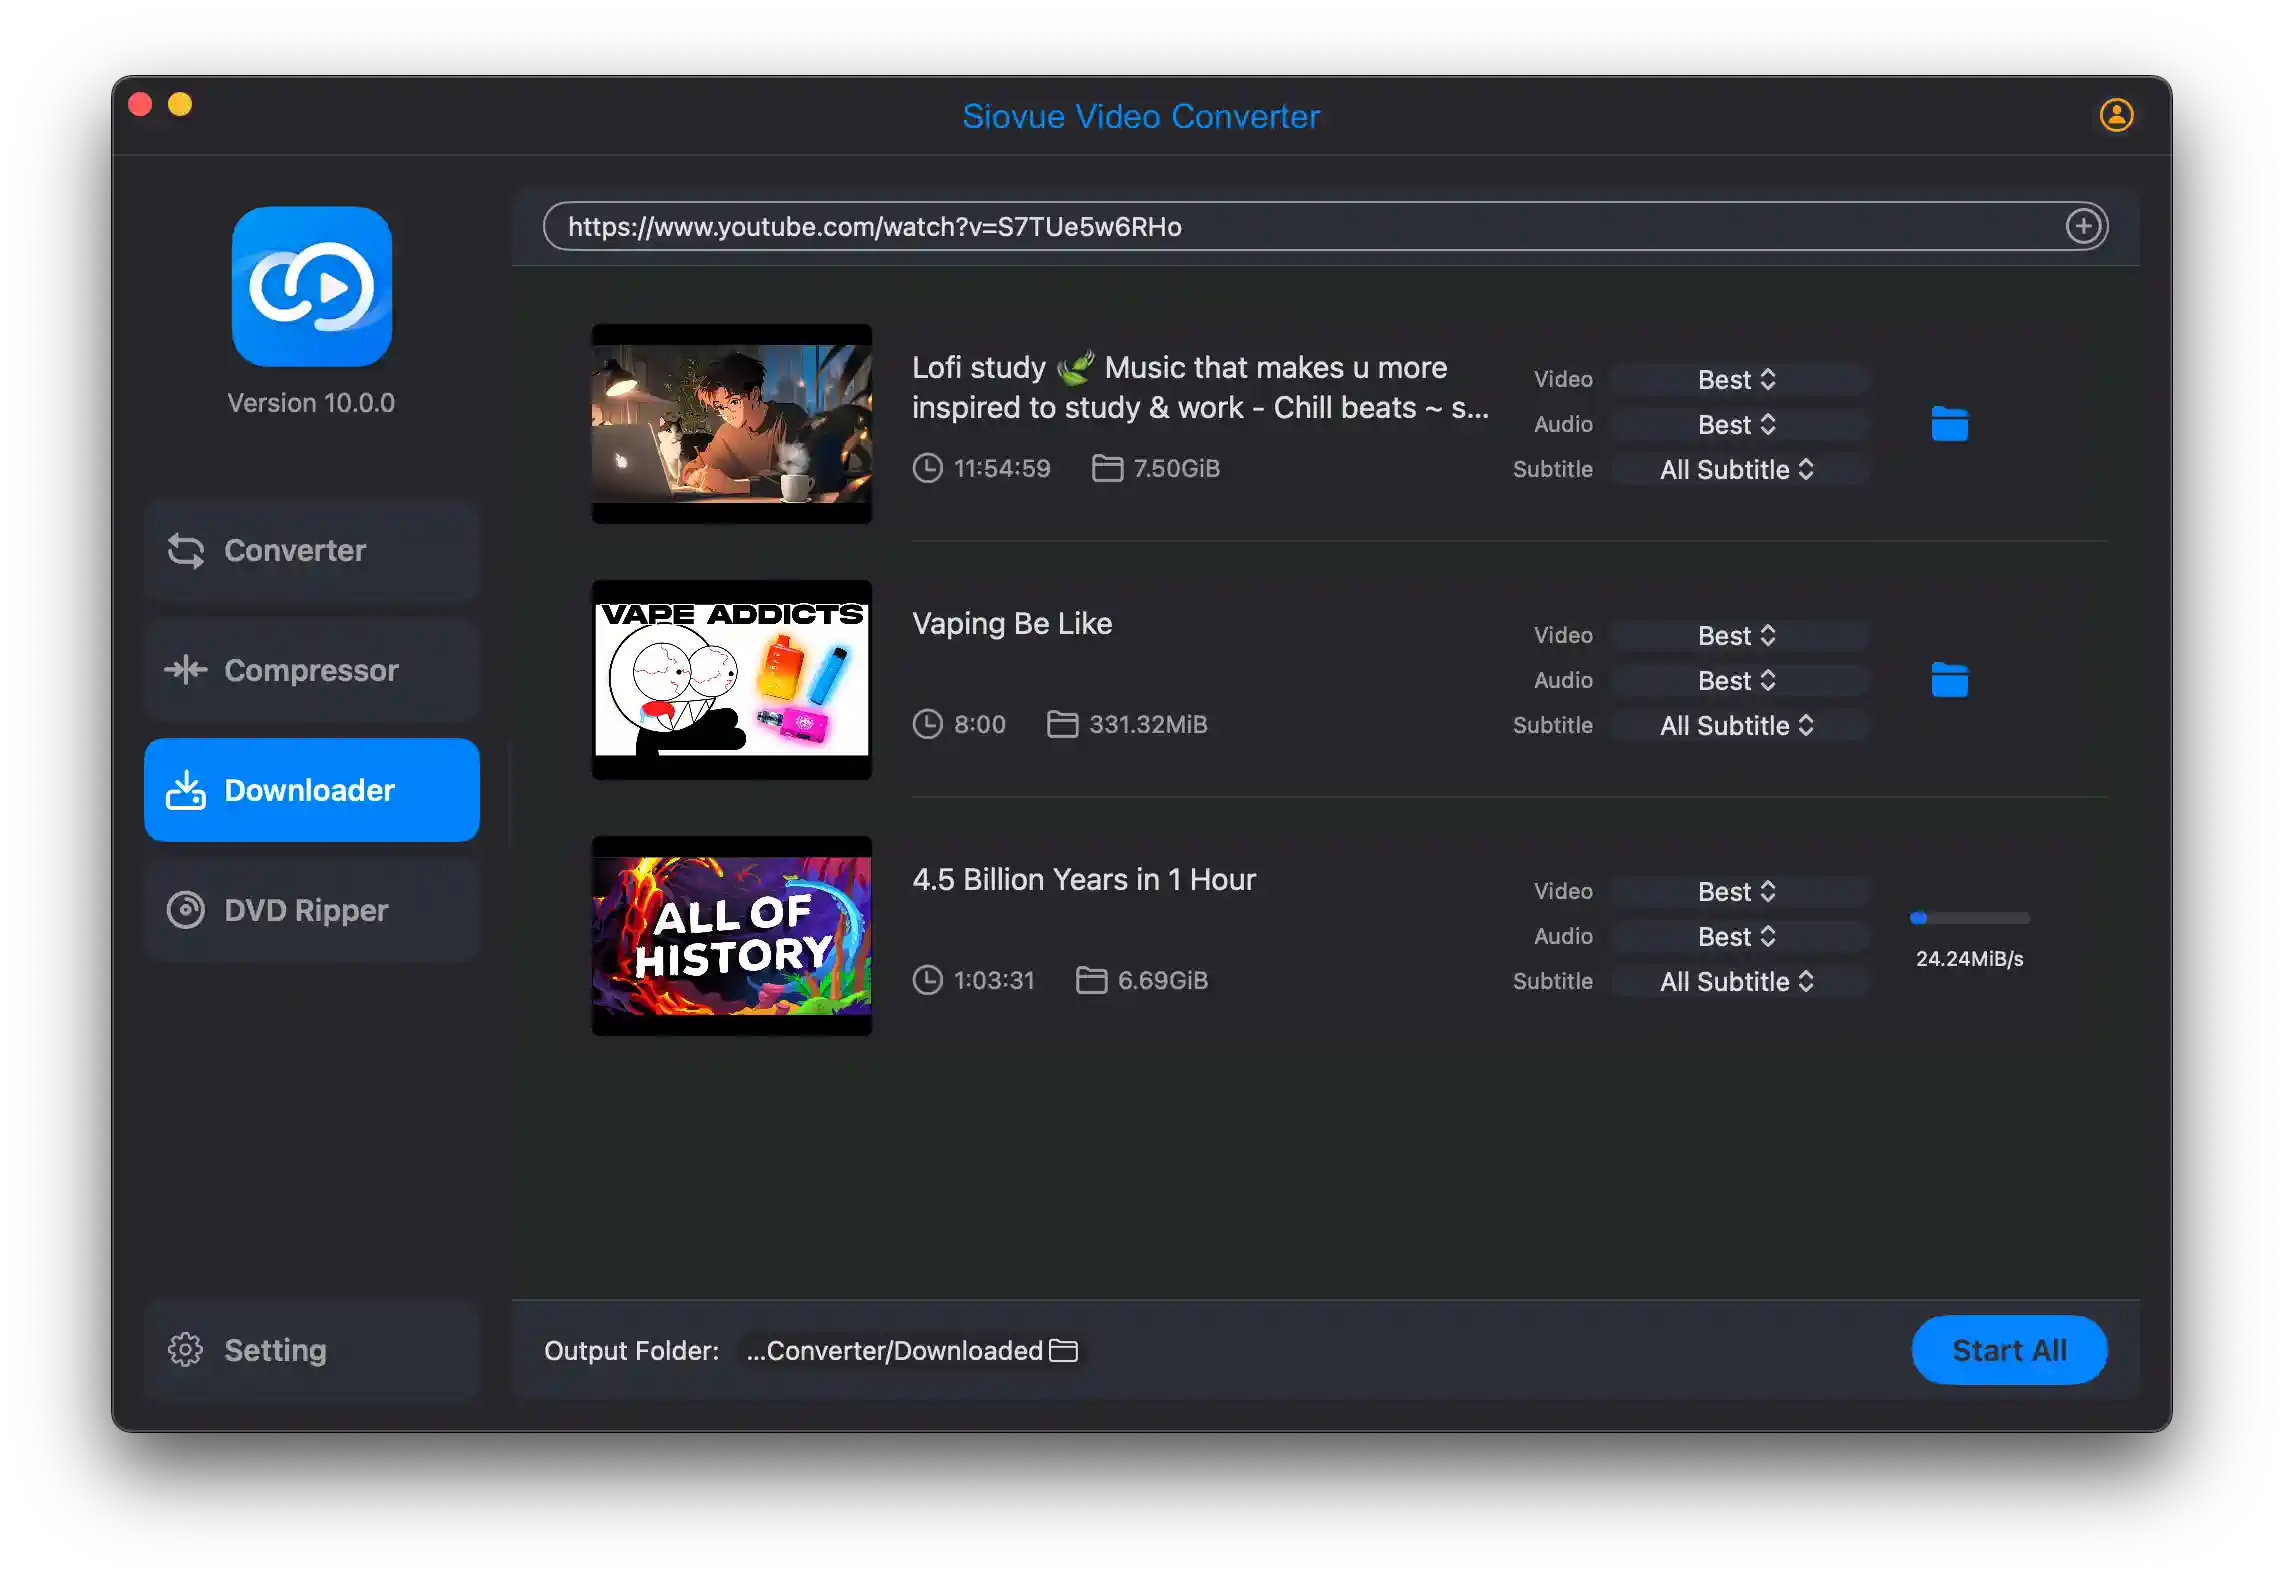
Video Downloader
Download your favorite videos and music from over 1200 websites, including YouTube, Facebook, Instagram, and Vimeo. Perfect for offline viewing without worrying about network connections or data usage.
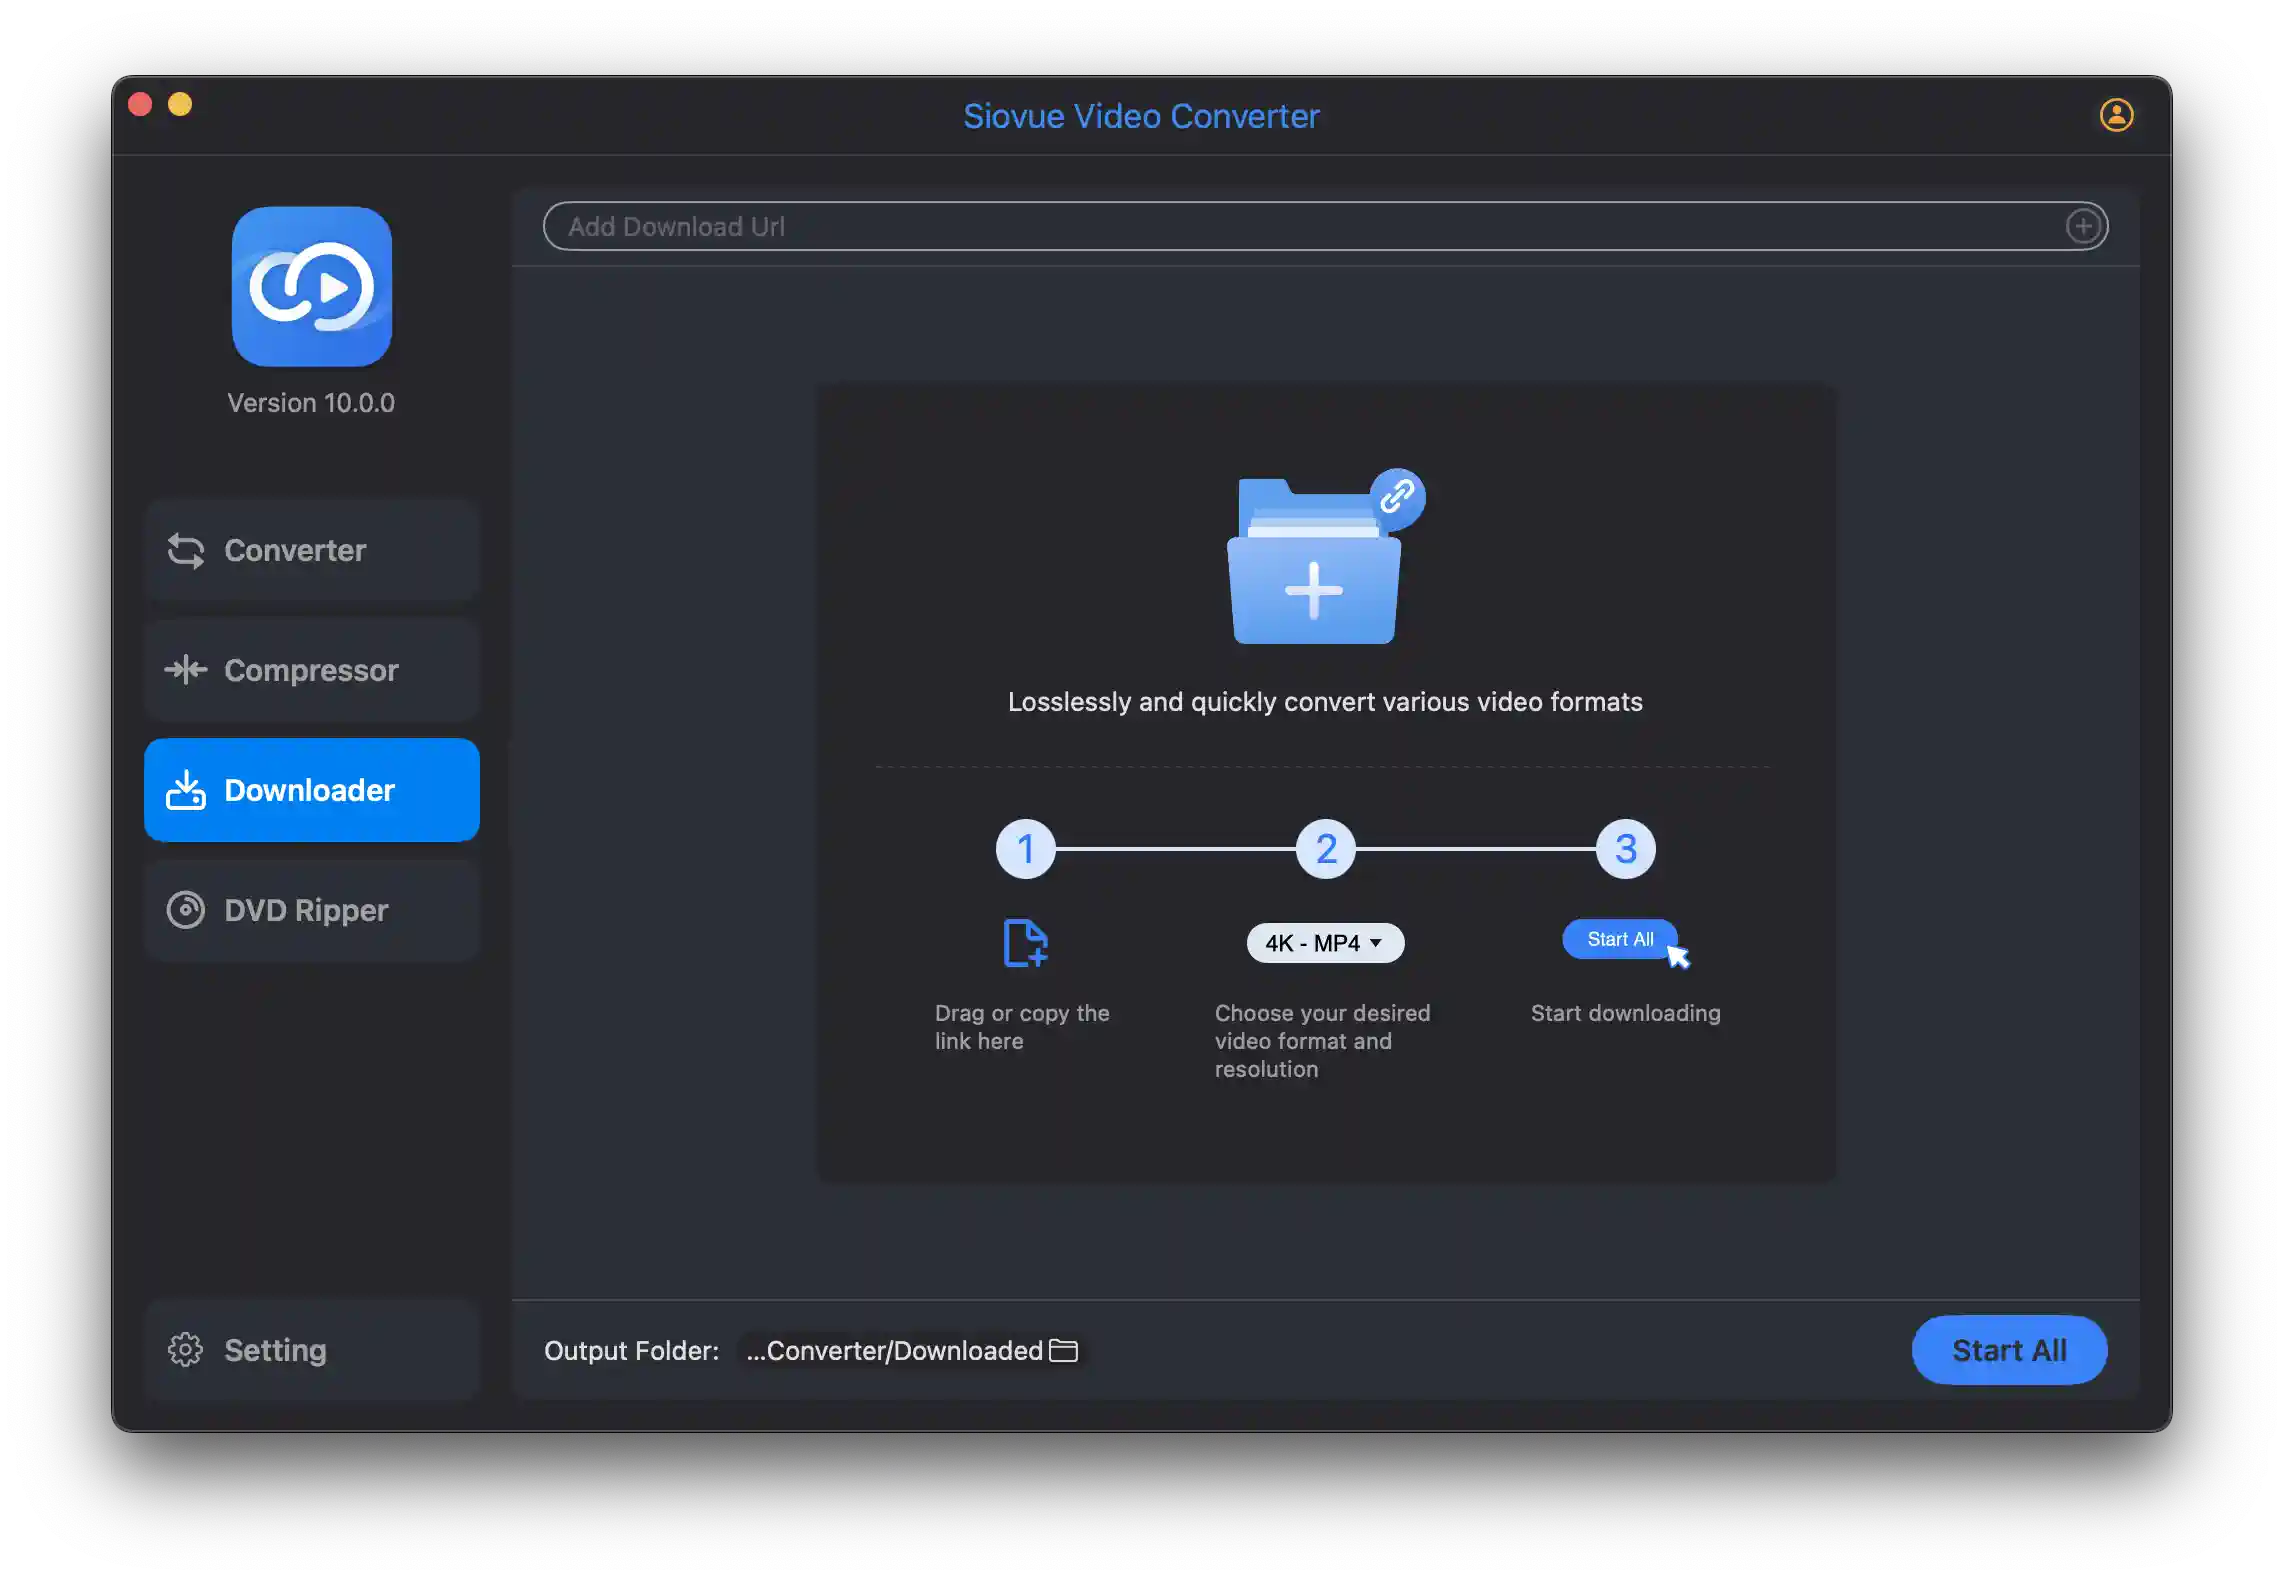
How to Download Videos
Step 1: Add Video Links
Drag and Drop Method
Drag the video link from your browser directly into the Downloader content area.
Copy-Paste Method
Copy the video URL, paste it into the address bar at the top of the Downloader area, and press Enter.
Step 2: Choose Quality and Format
After loading the link, Siovue Video Converter automatically selects the best quality. You can manually adjust if needed:
- Video Resolution: Select from available quality options (480p, 720p, 1080p, etc.)
- Video Format: Choose between MP4, MKV, etc.
- Audio Format: MP3, M4A, etc.
- Audio Bitrate: Higher for better quality, lower for smaller files
Step 3: Choose Subtitles (Optional)
If the video offers subtitle options:
- Select whether to download subtitles
- Choose which languages to download
- For YouTube, you can download auto-generated subtitles
Step 4: Set Download Directory
Click the  icon to choose where downloaded files will be saved. You can also set a default directory in Settings.
Step 5: Start Downloading
Click the button to download all videos, or the ![]() button for individual items.
button for individual items.
Step 6: Access Downloaded Files
Once download completes, click the ![]() button to view the files in Finder.
button to view the files in Finder.
Important Notice
When using the Video Downloader feature, ensure you have the right to download and use the content. Comply with copyright laws and respect intellectual property rights.
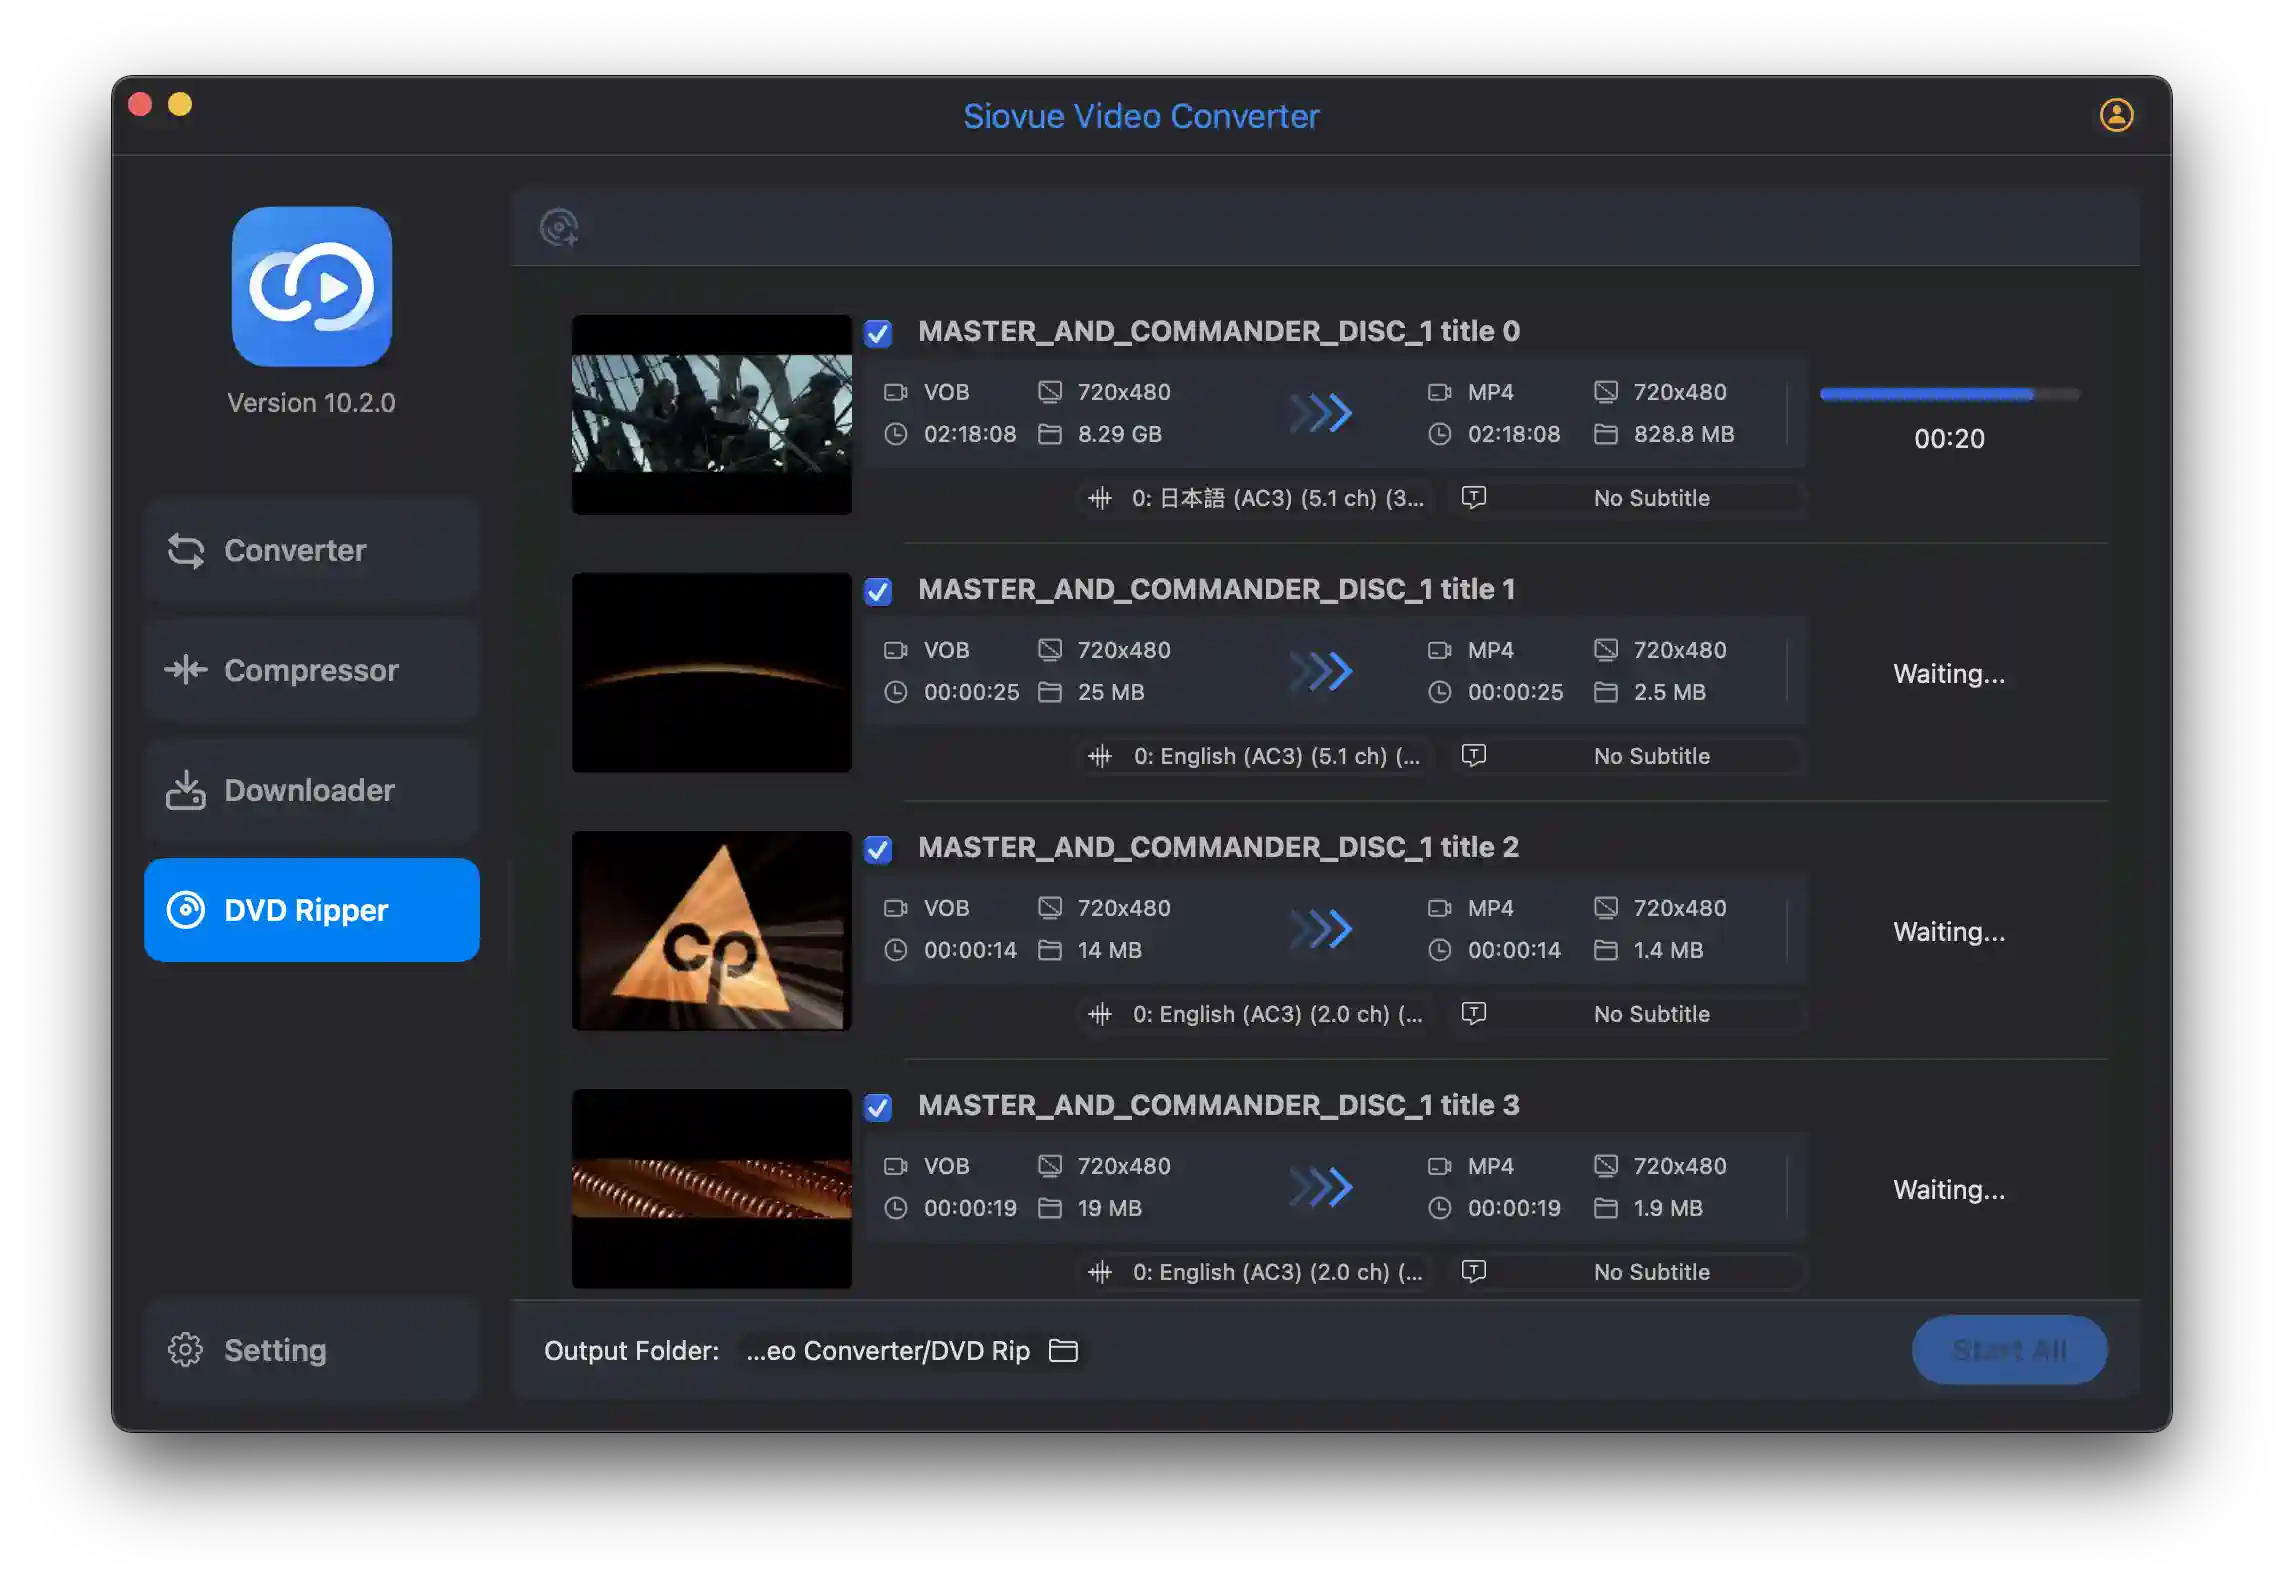
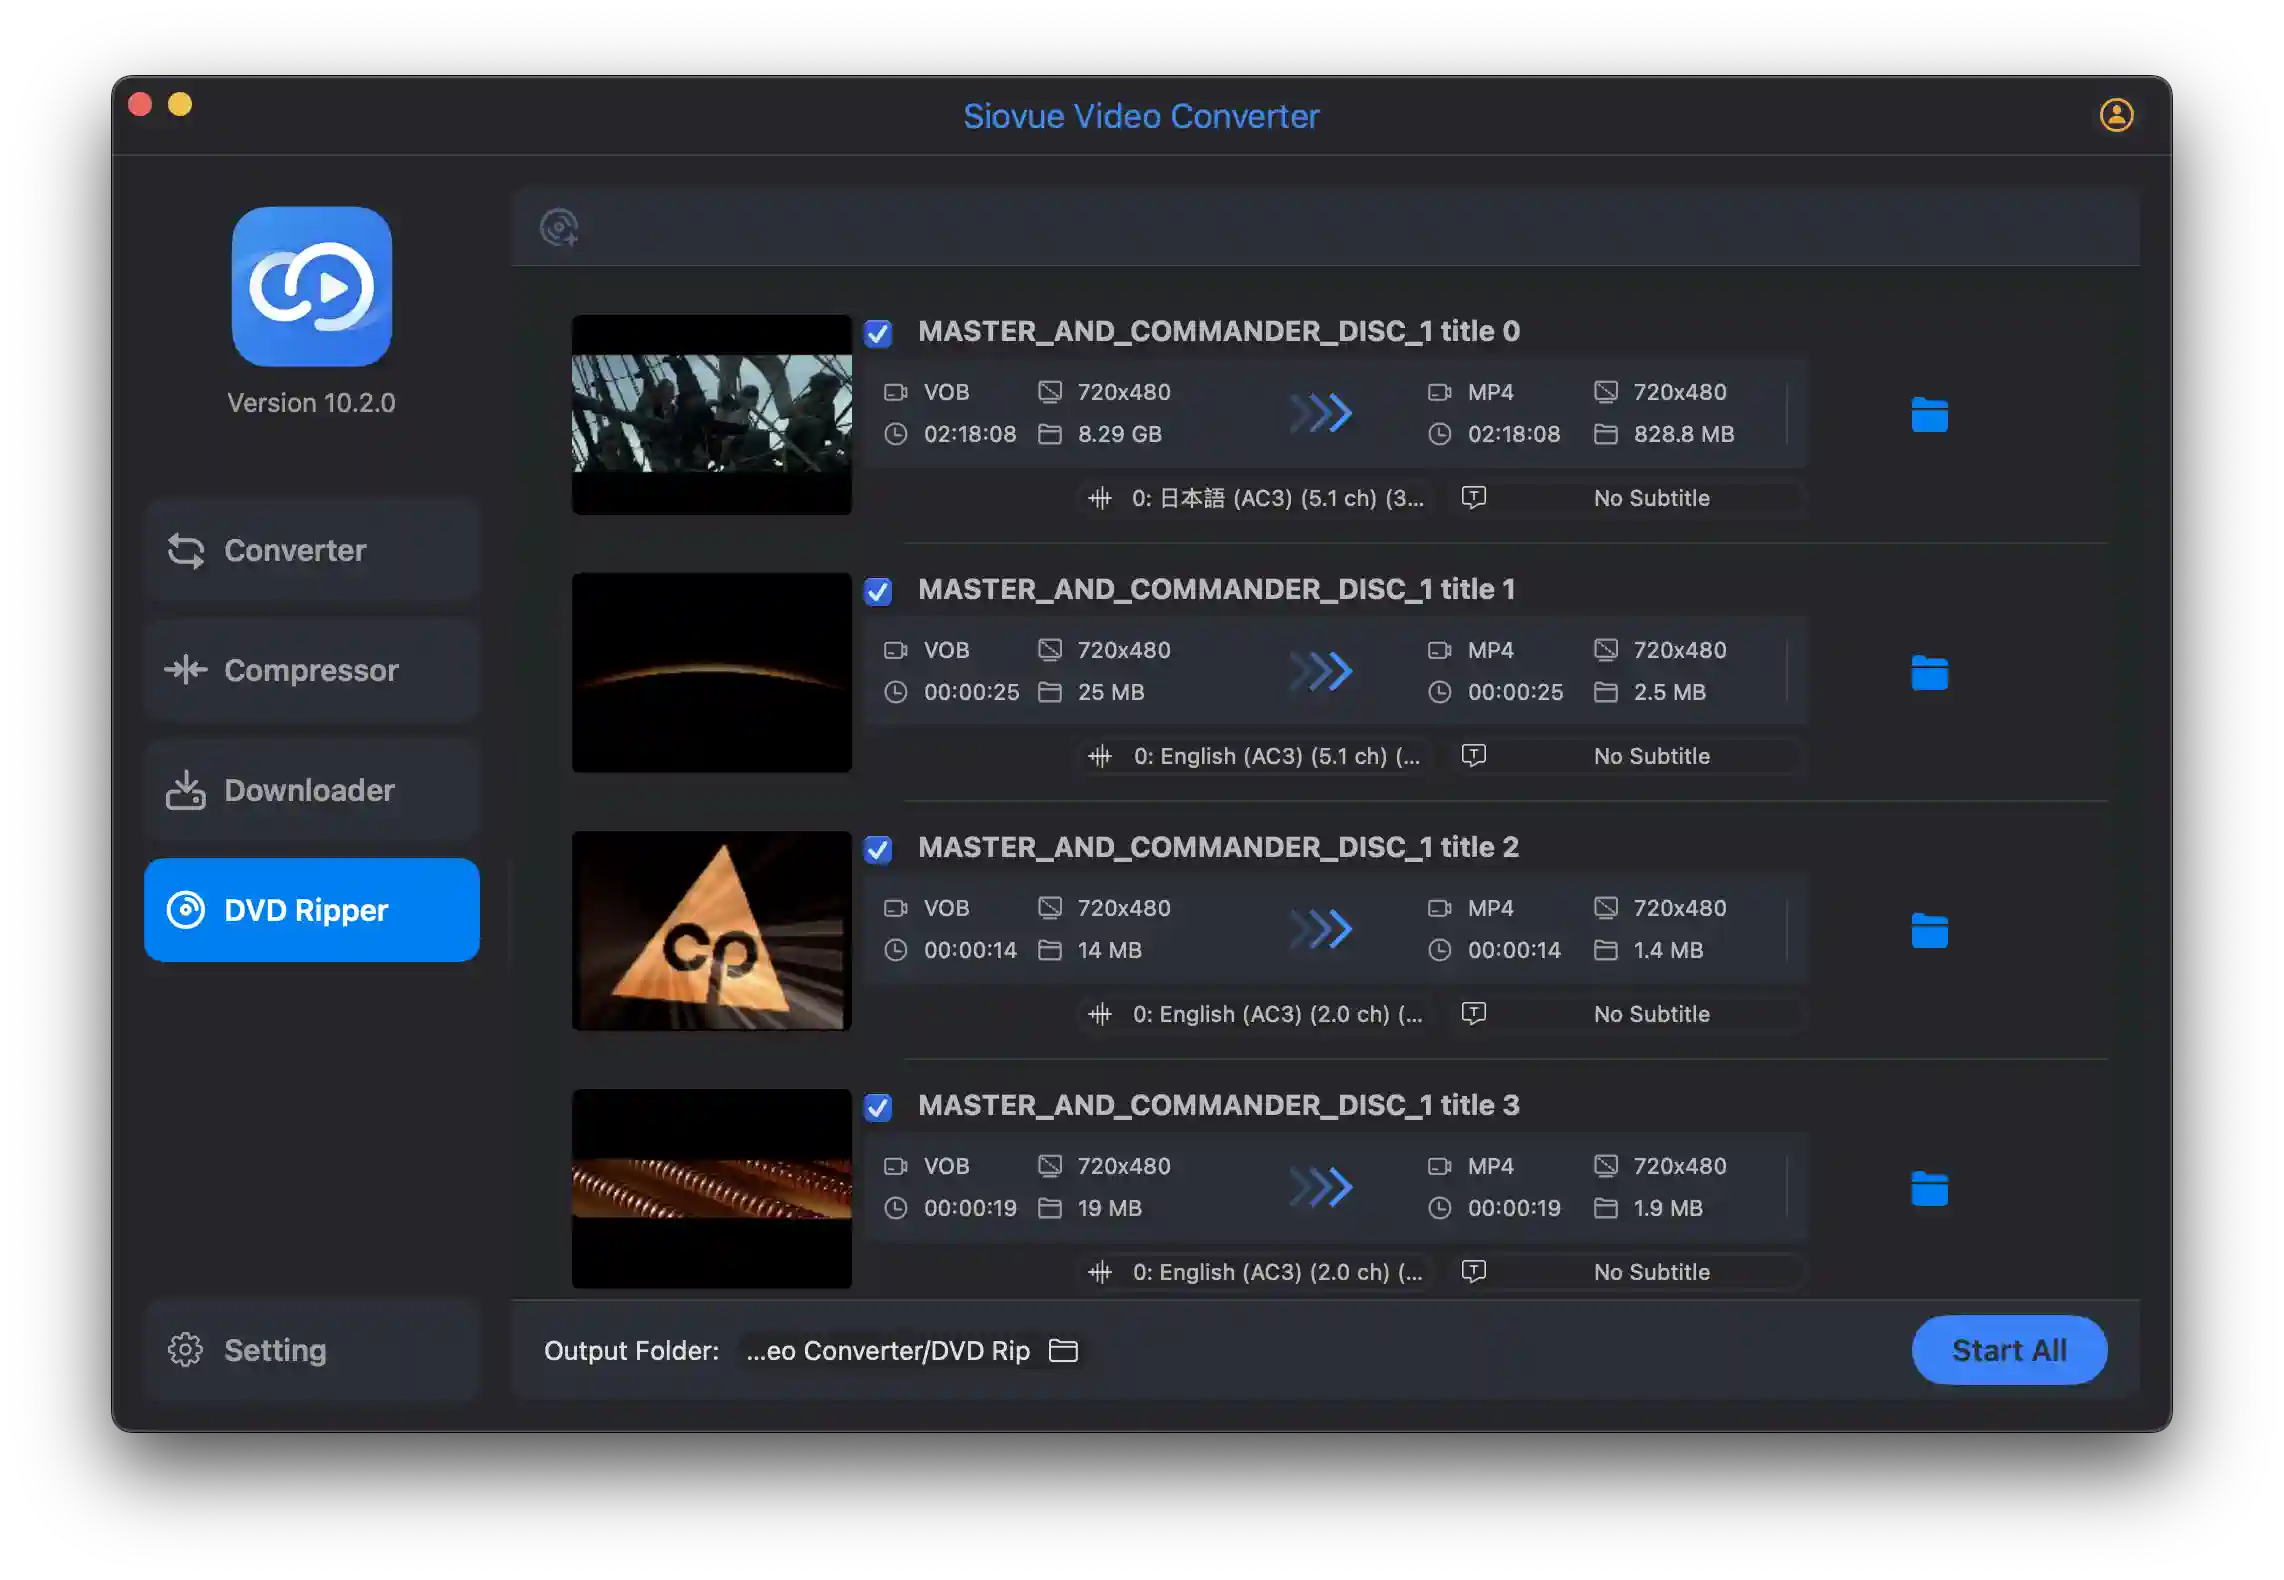
DVD Ripper
Siovue Video Converter provides a robust DVD Ripper feature that converts DVD content to common video formats, preserving original quality, audio tracks, and subtitles. Perfect for archiving your DVD collection or making it accessible on modern devices.
Key Features
- Multi-format conversion
- Multiple audio track support
- Subtitle preservation
- Quality maintenance
How to Convert DVD to MP4 or Other Formats
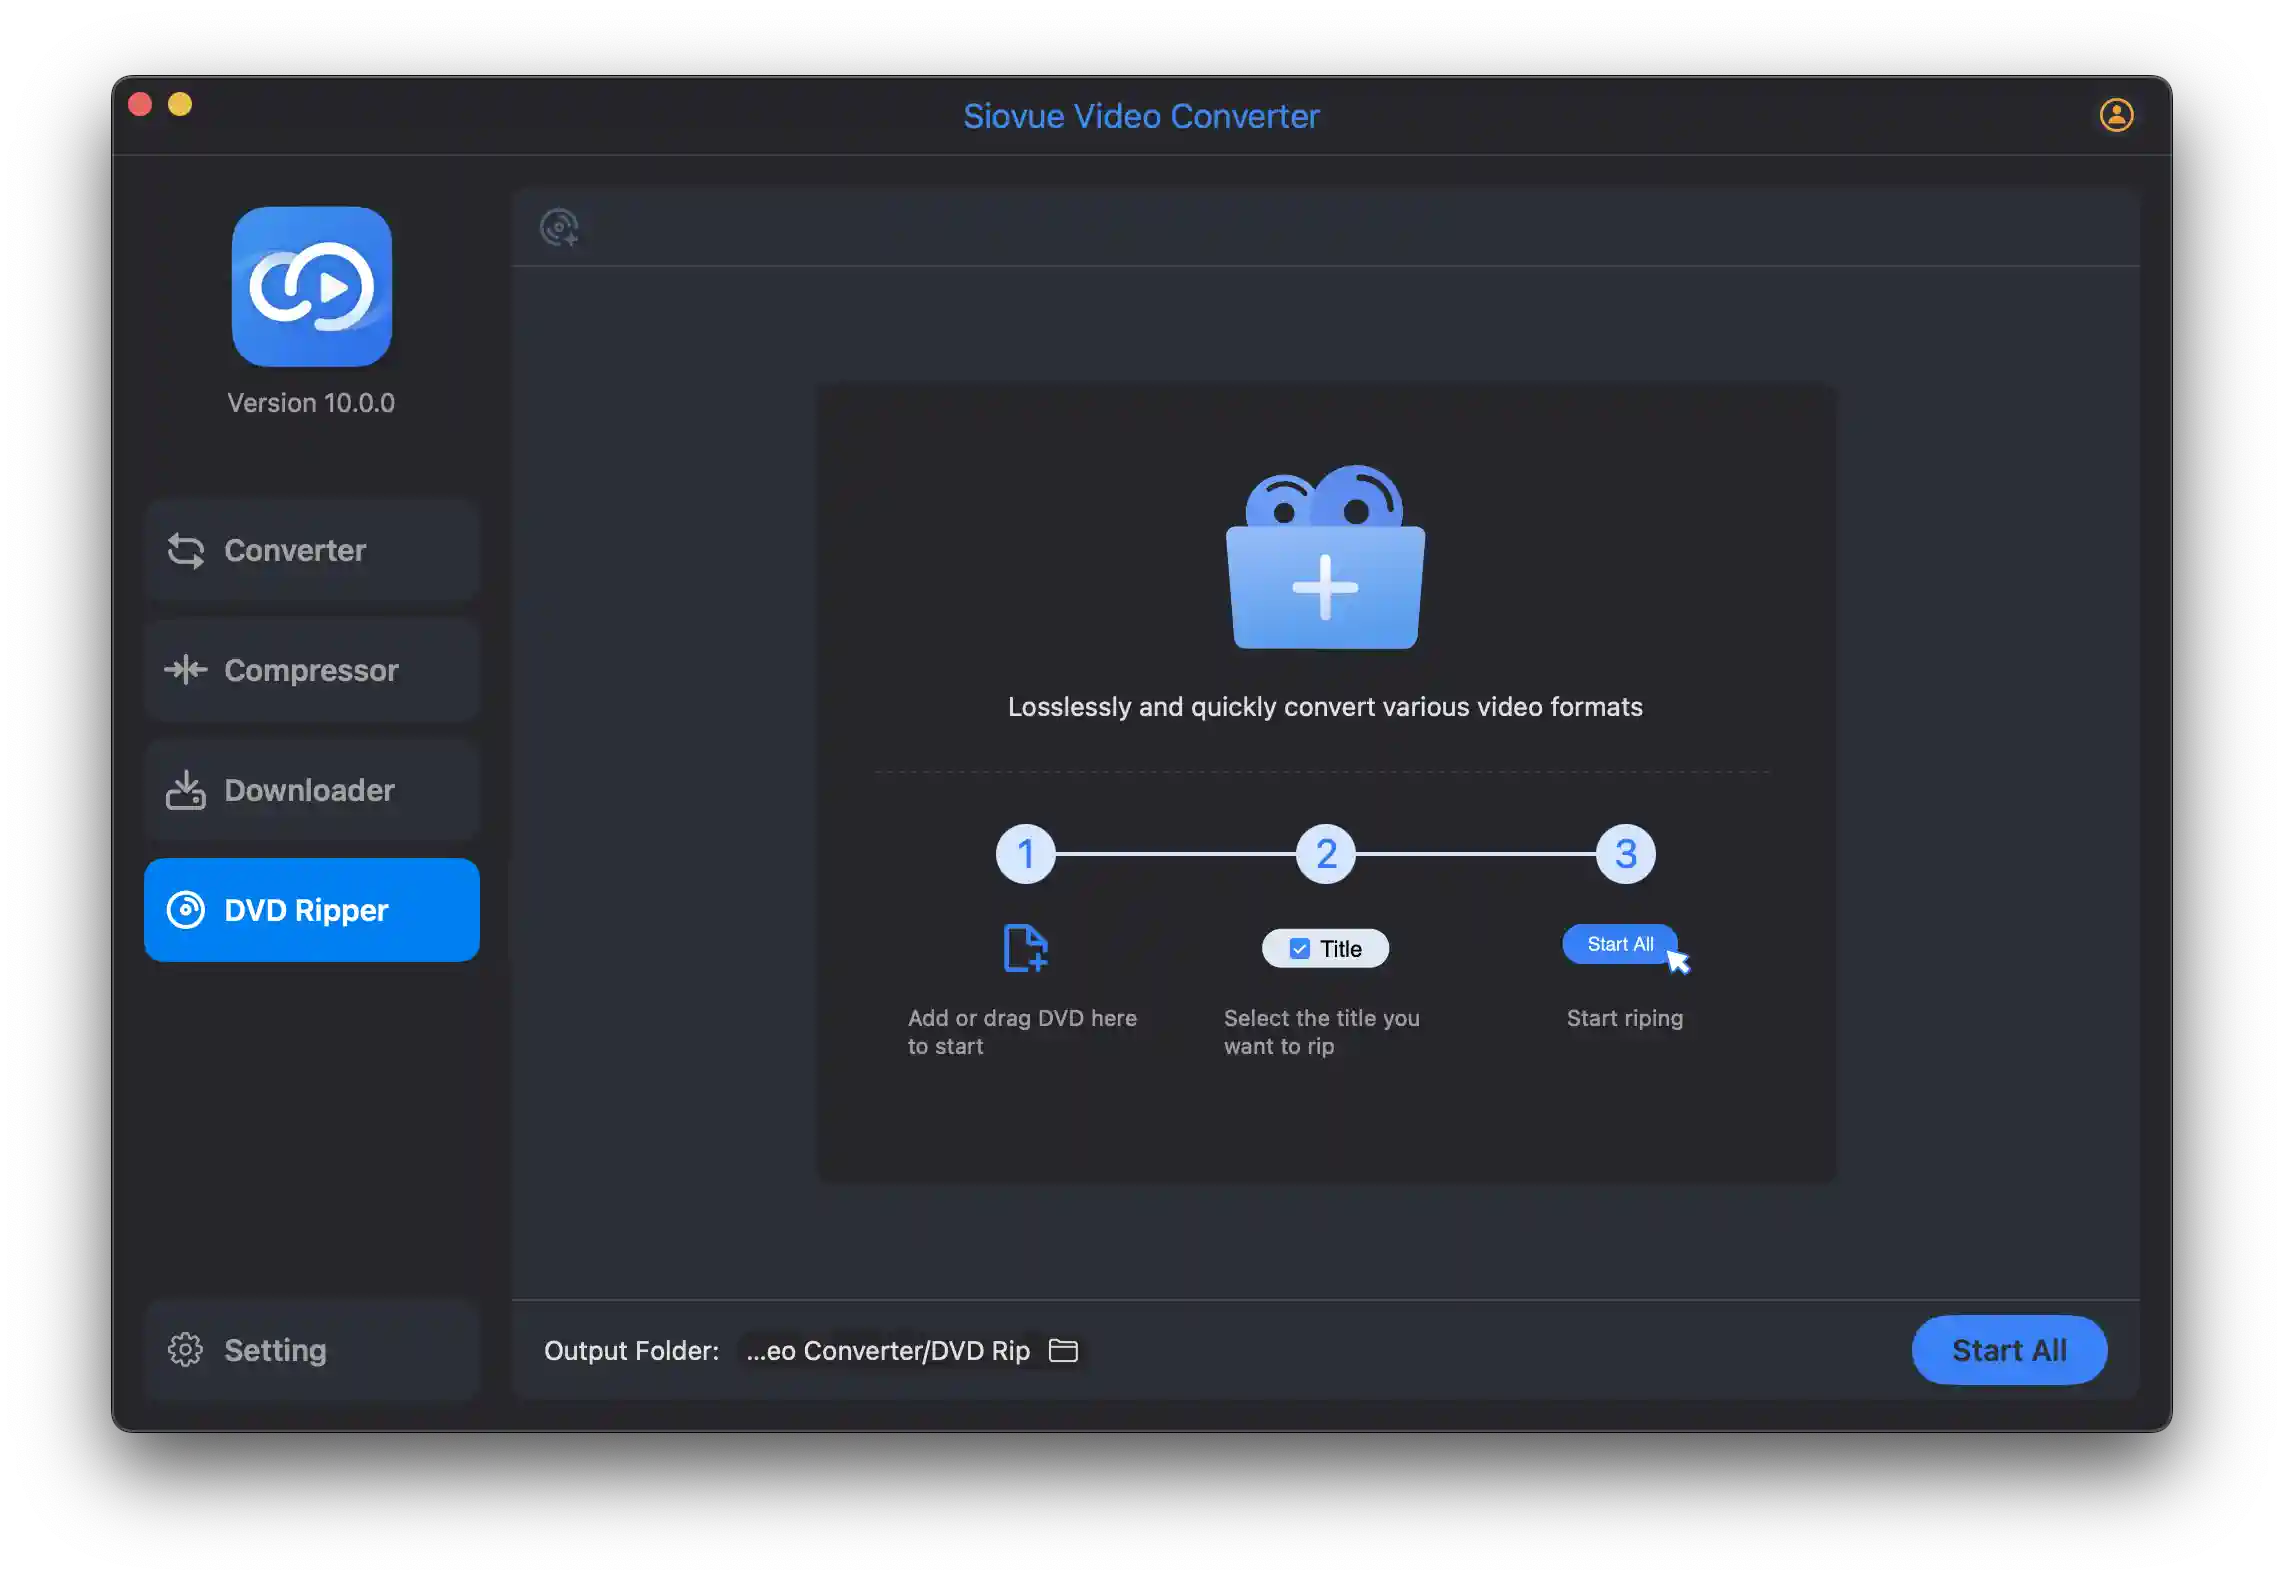
Step 1: Insert the DVD
Insert the DVD into your SuperDrive or external DVD drive. Ensure your Mac can properly read the disc content.
Step 2: Select DVD Ripper
In the left column of the main interface, select the DVD Ripper option.
Step 3: Import the DVD
- Drag and Drop: Drag the DVD icon or VIDEO_TS folder into the content area.
- Finder Import: Click the
 button to open Finder and select the DVD.
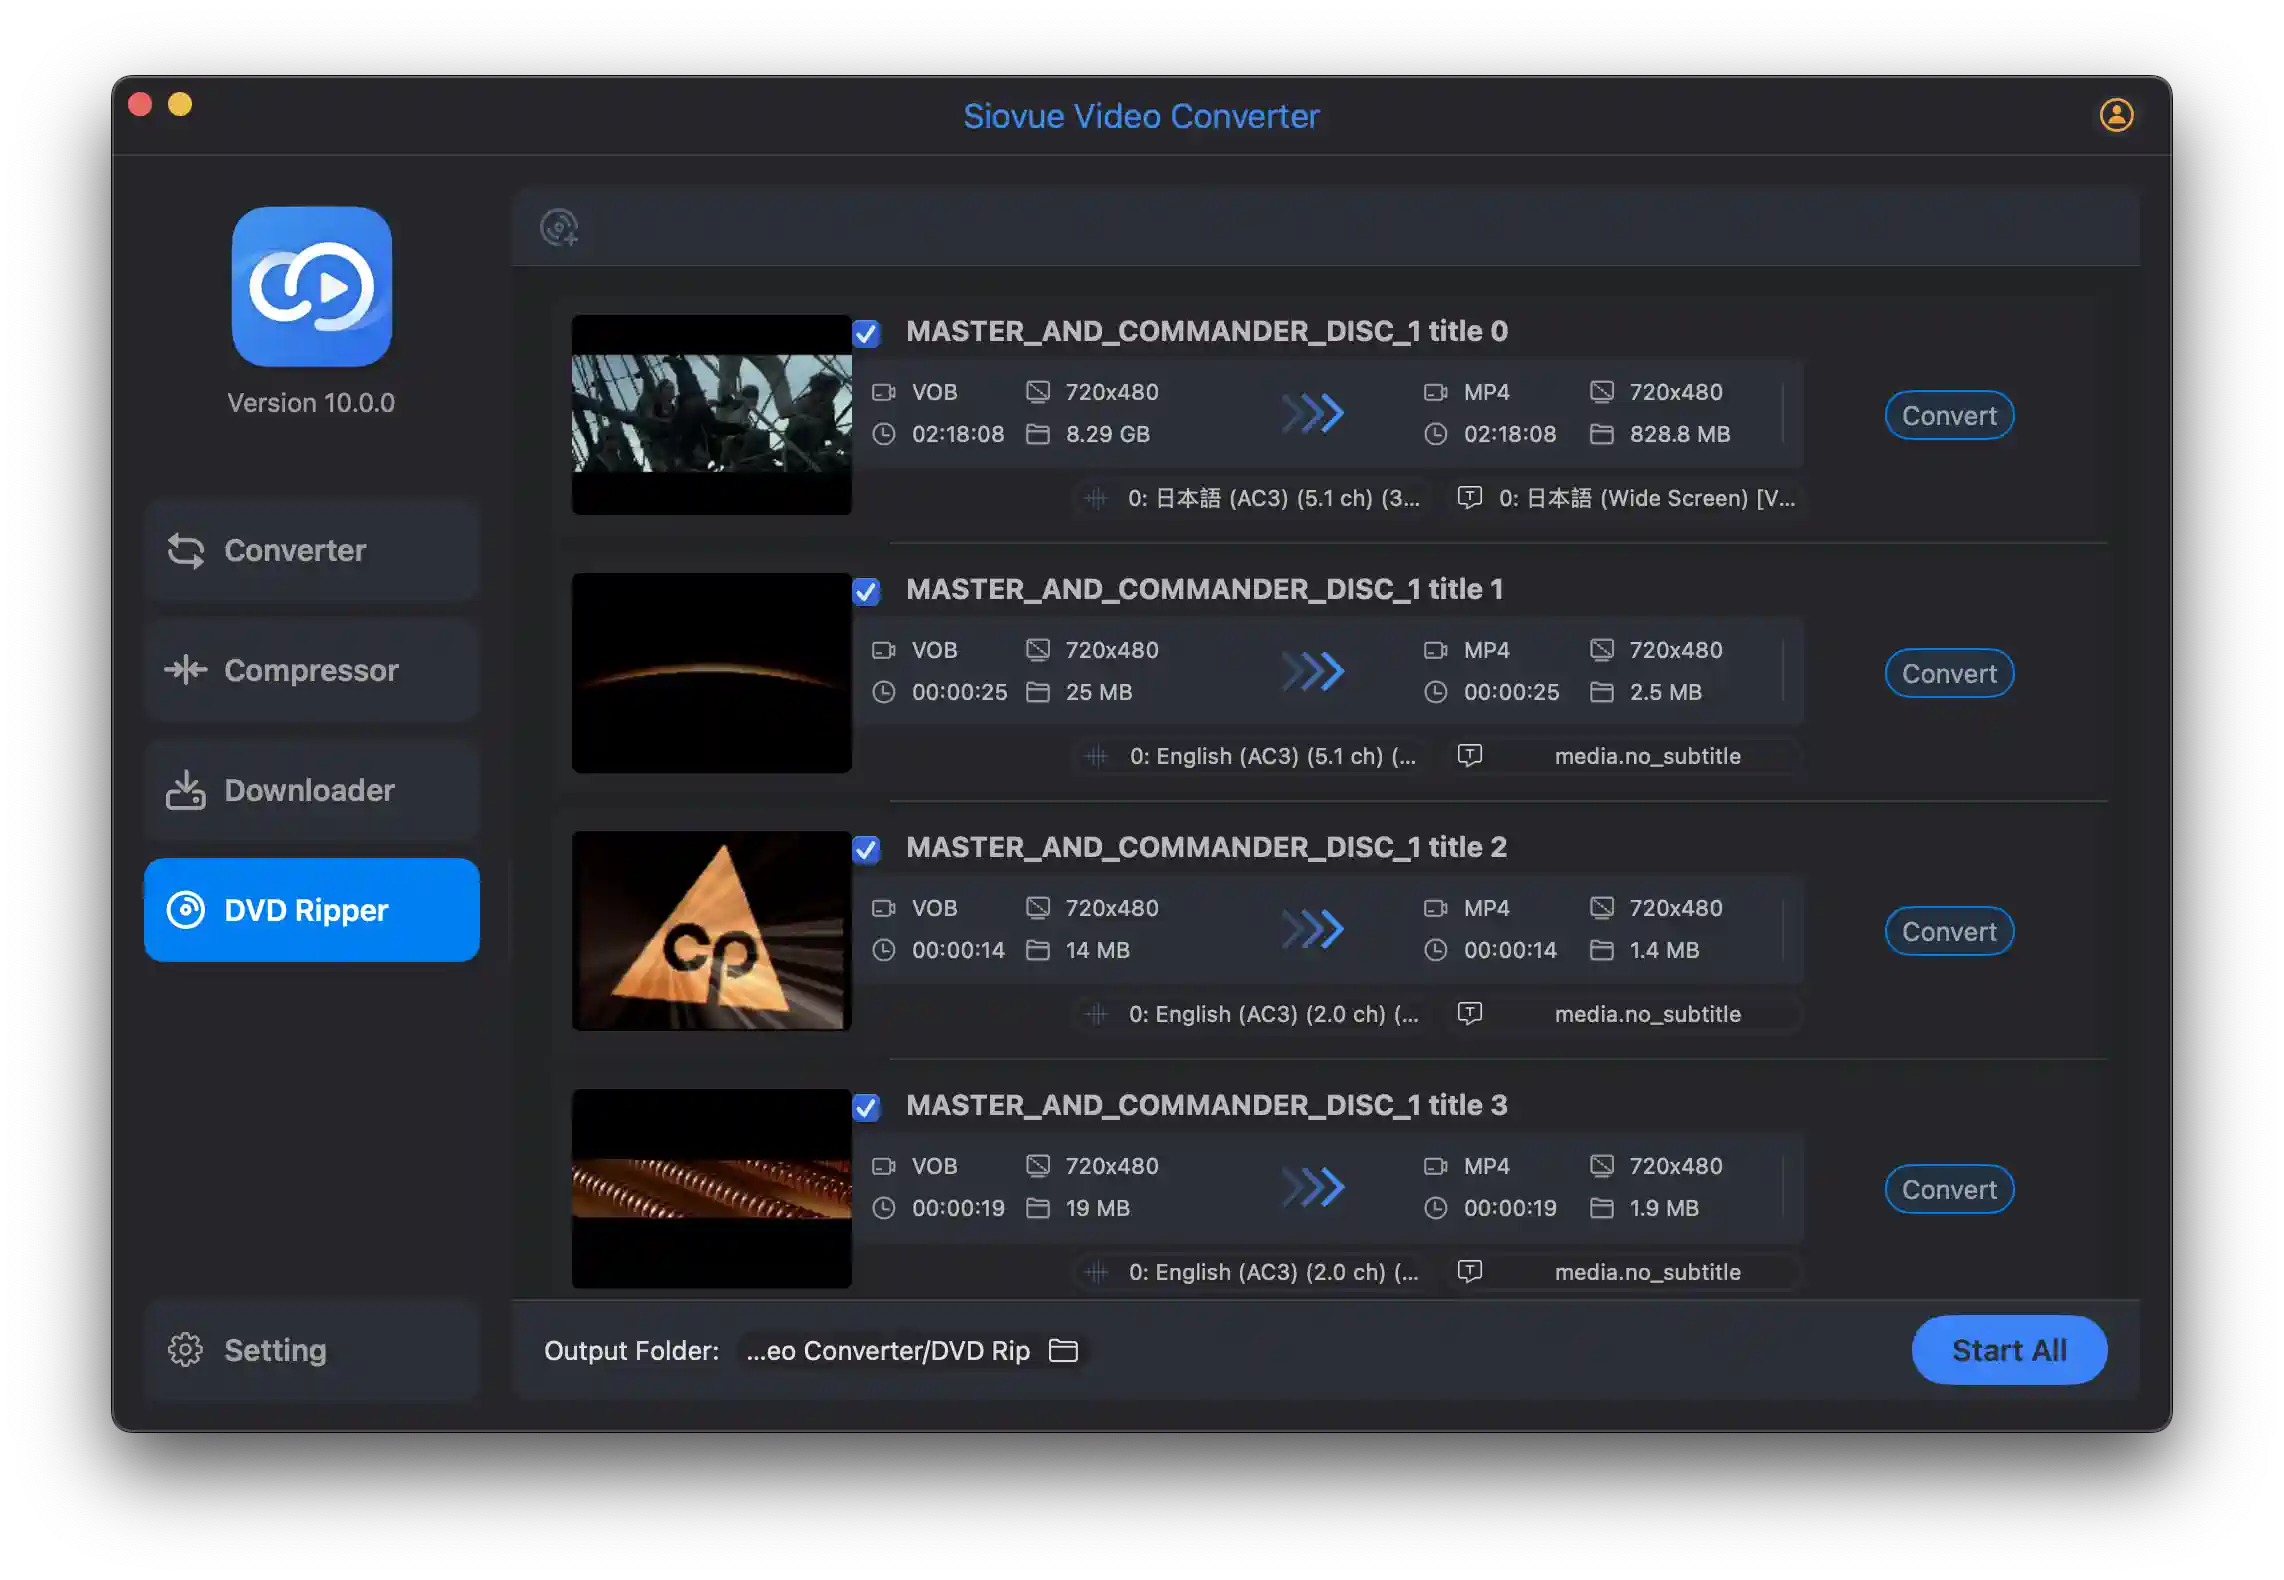
The app will show loading progress and then display DVD content with Menu and Title options. Use checkboxes to select the titles you want to convert.
Step 4: Set Save Directory
Click the  icon to select where converted files will be saved.
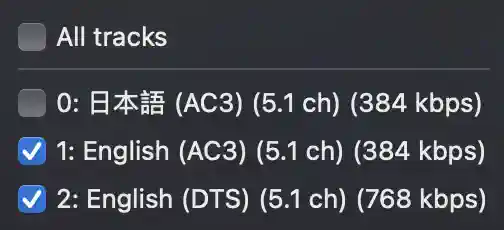
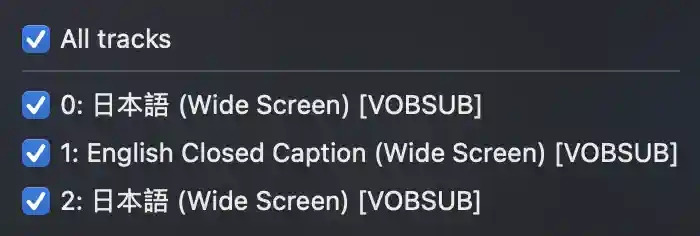
Step 5: Set Audio and Subtitles
By default, all audio and subtitle tracks are retained. You can customize which ones to include:
Audio Selection
Click the audio selector  to open the audio selection window.
Subtitle Selection
Click the subtitle selector  to open the subtitle selection window.
Step 6: Start Conversion
Click the Start Conversion button to begin processing. Conversion time depends on the DVD content amount and your computer's performance.
Step 7: Access Converted Files
When complete, click the ![]() button to view your converted files in Finder.
button to view your converted files in Finder.
Note: When using the DVD Ripper feature, ensure you have the right to convert and use the DVD content. Comply with relevant laws and copyright requirements.
Settings
The Settings interface contains general configuration options to customize your experience.
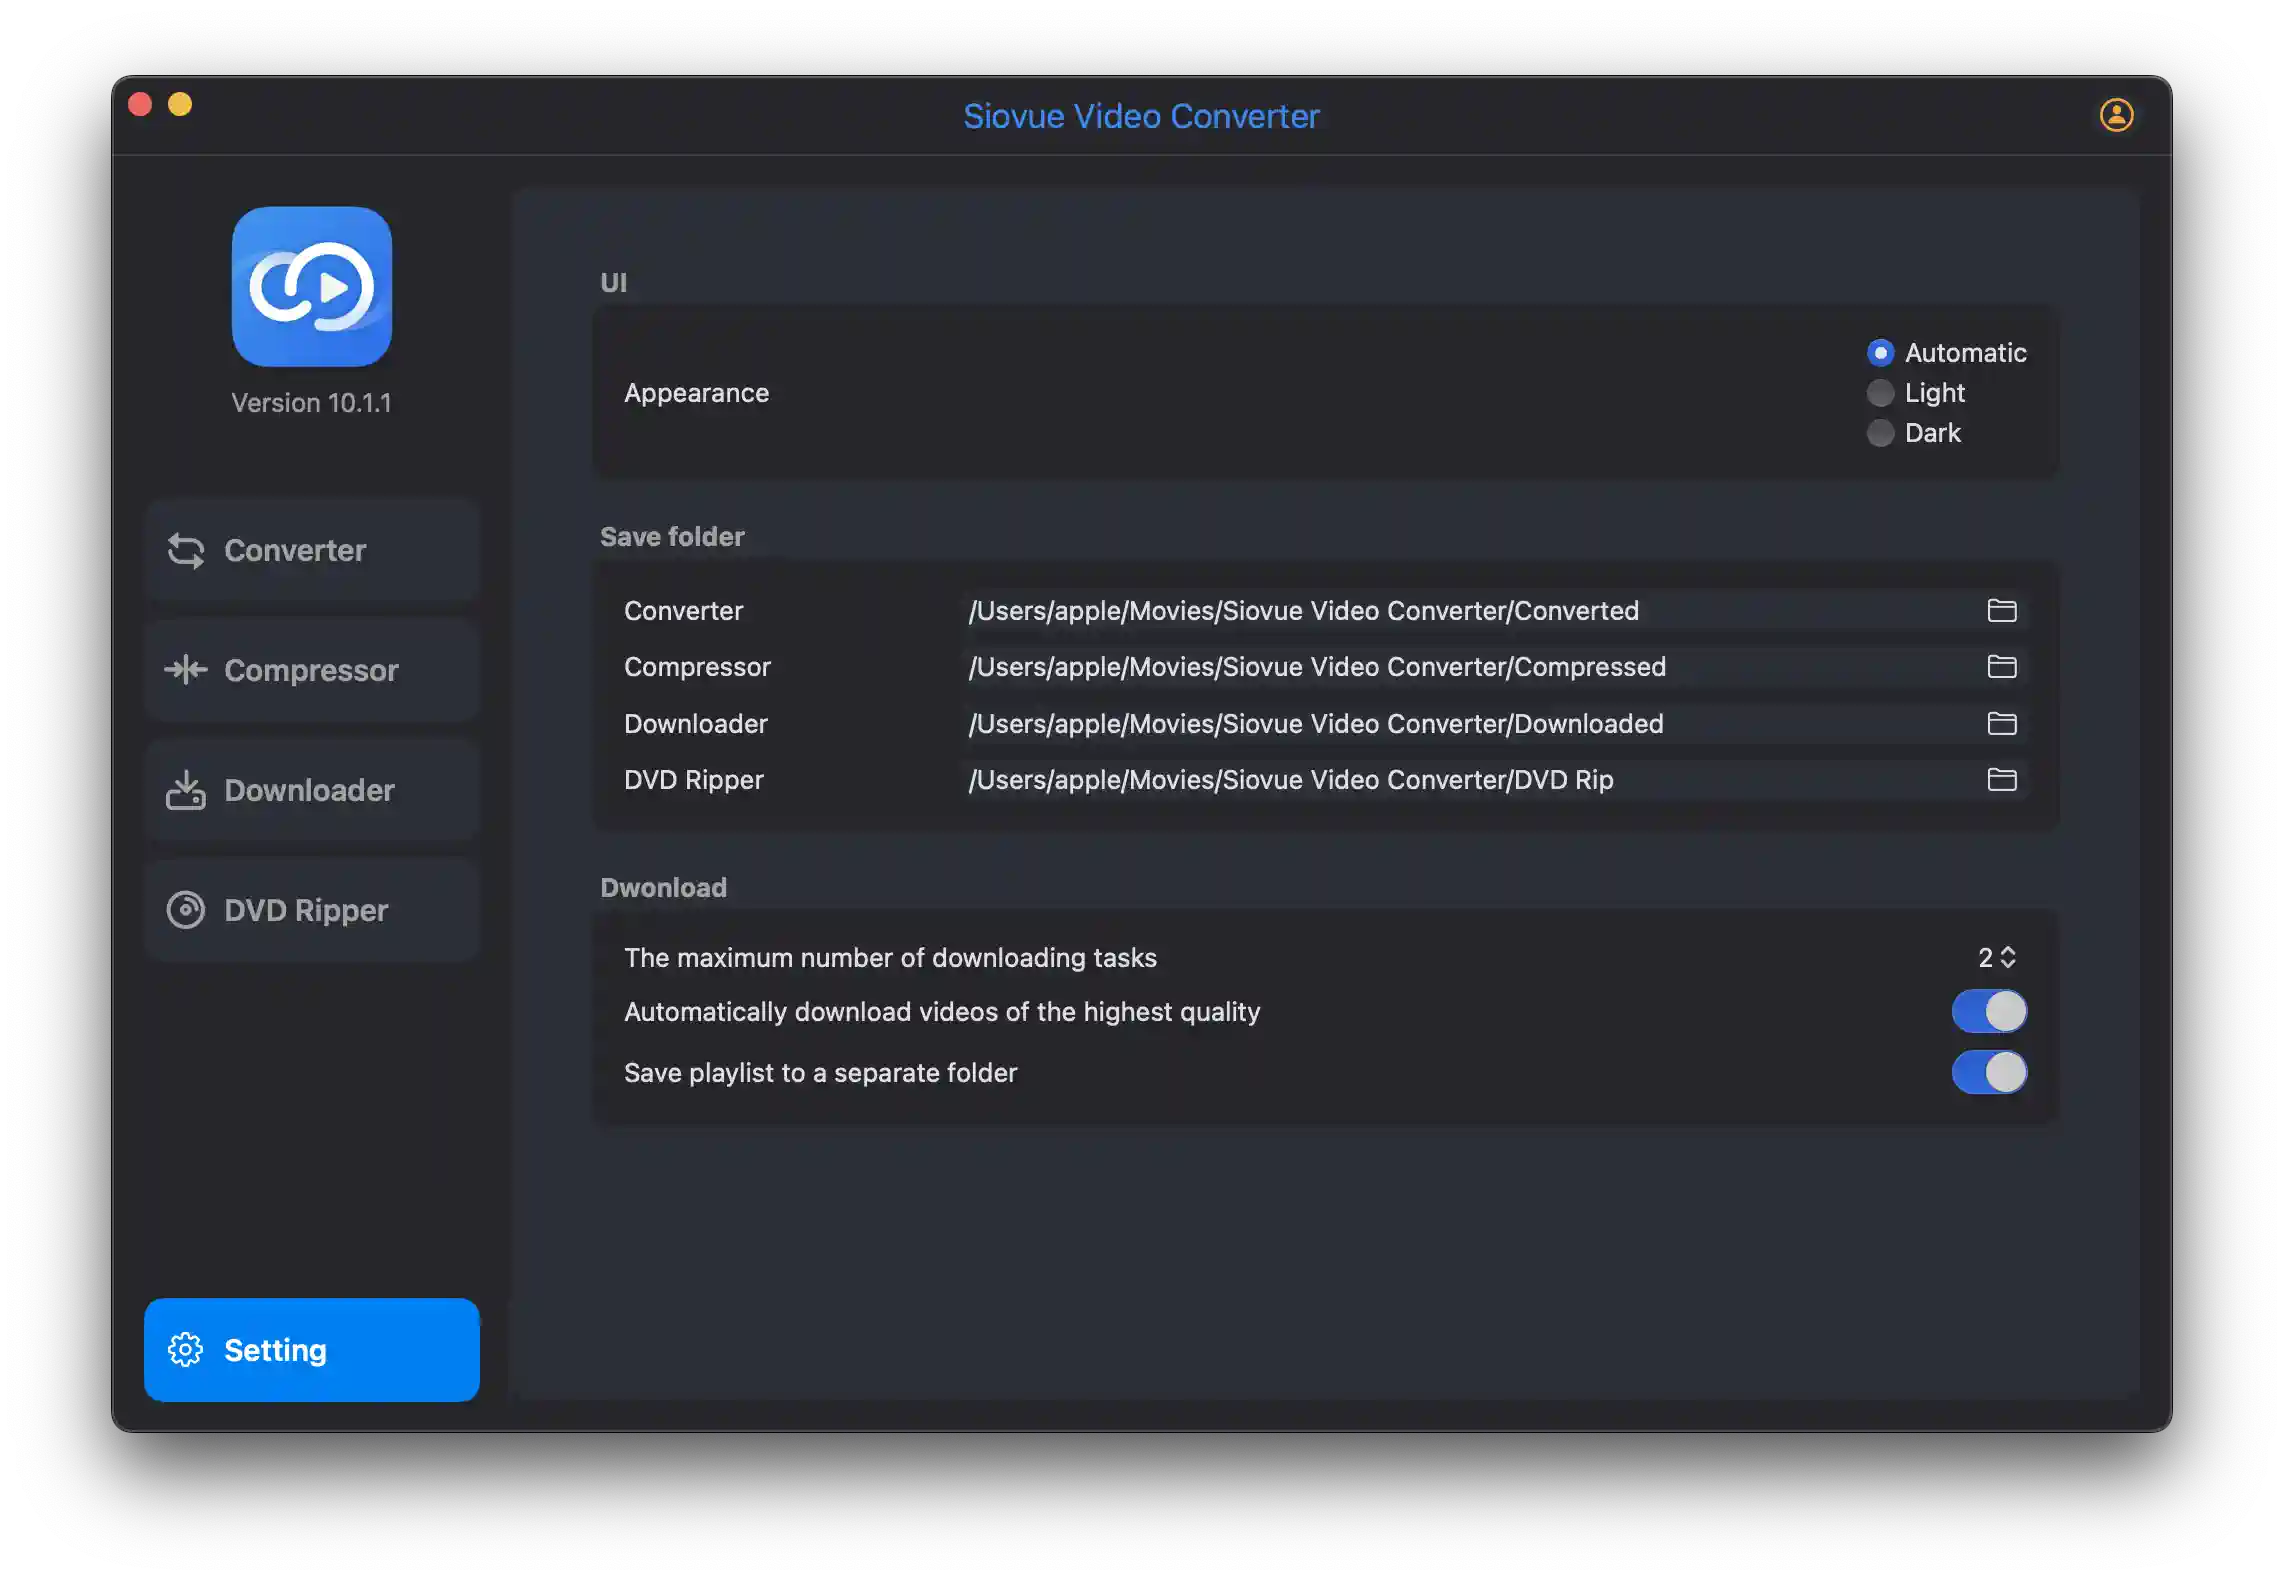
UI Settings
Appearance:
- Automatic: Follow system settings
- Light: Light mode
- Dark: Dark mode
Save Folders
- Converter: Set save directory for converted files
- Compressor: Set save directory for compressed files
- Downloader: Set save directory for downloaded files
- DVD Ripper: Set save directory for DVD conversions
Download Options
- Max download tasks: Set simultaneous downloads (1-5)
- Auto-select highest quality: Automatically choose best quality
- Playlist organization: Save playlist videos to separate folders
Registering a Siovue ID
A Siovue ID helps you activate products, receive customer support, and get discounts on other Siovue products.
Existing Siovue ID
Click the user button in the upper right corner of the main interface to open the Login window. Enter your email and password, then click the Login button.
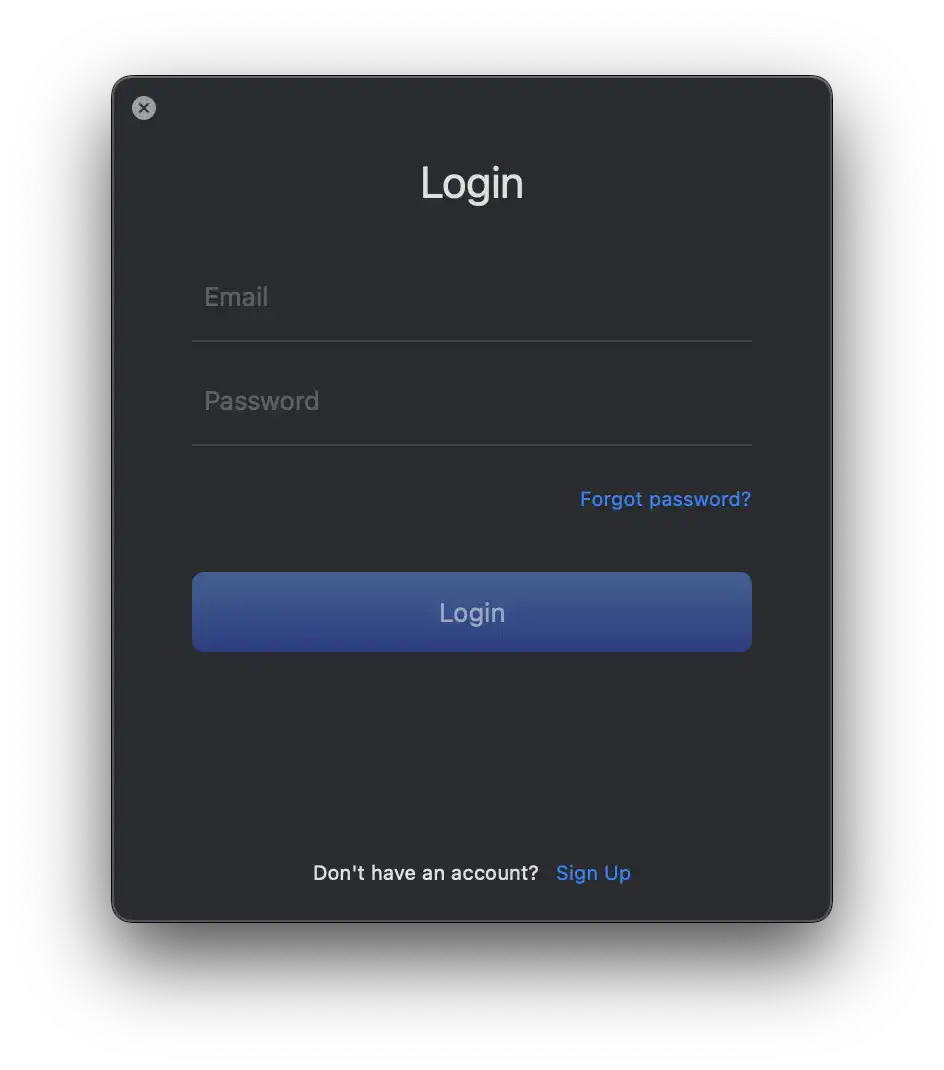
New Siovue ID
Click the Sign Up button at the bottom of the Login interface to switch to the Create Siovue ID screen. Fill in your details and register.
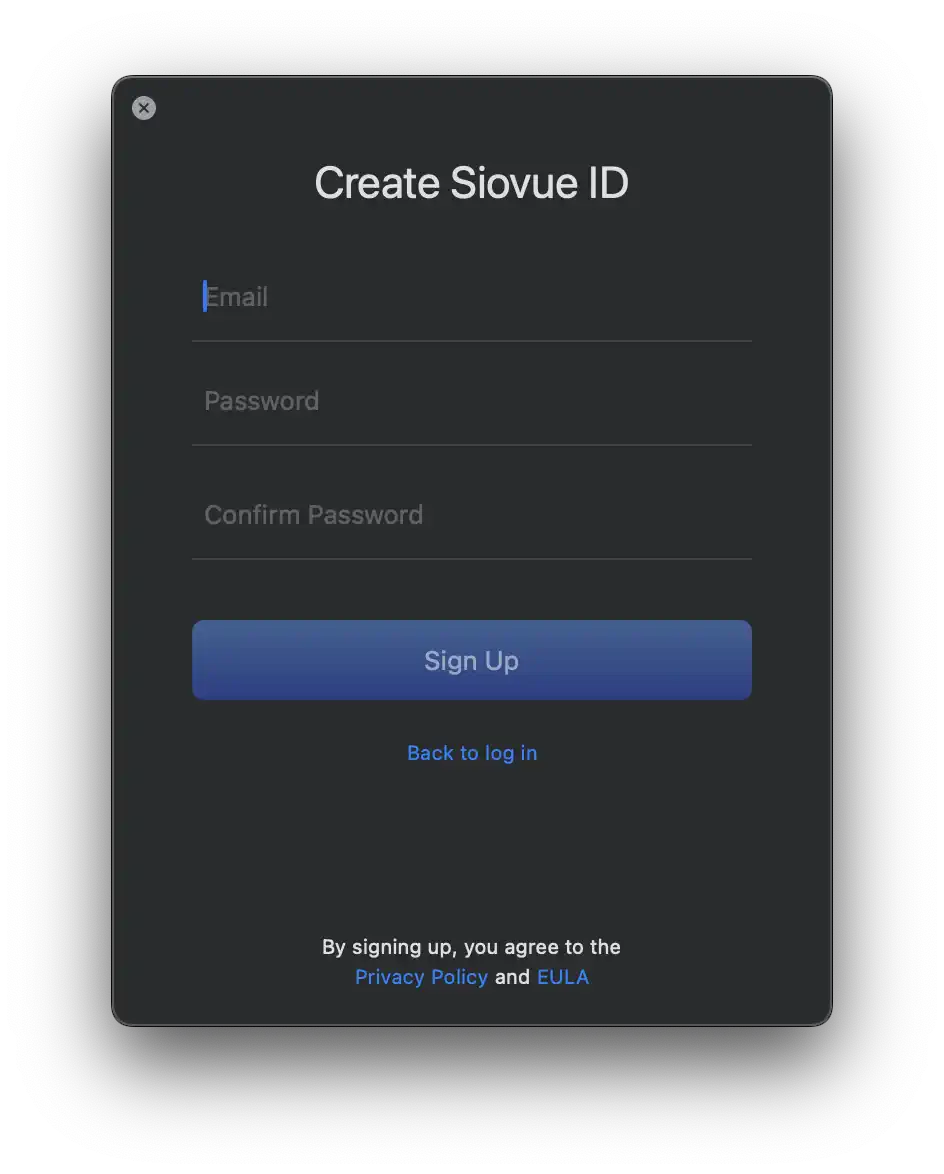
By registering for a Siovue ID, you agree to our Privacy Policy and End-User License Agreement.
Need More Help?
If you have additional questions or need further assistance, our support team is ready to help.
Contact Support Visit FAQ